Think you’d agree with me if I said production scheduling is a tedious process. Most production scheduling software like Movie Magic Scheduling is antiquated (and that’s putting it lightly). It’s confusing, expensive, and often time is not worth the trouble.
In today’s post, I’m going break down how to create a scene breakdown (bad pun, sorry). Making a script breakdown online with StudioBinder is fast, easy, and believe it or not, kinda fun. Let’s jump in!
Scene Breakdown basics
1. What is a Scene Breakdown?
So you've got your script in hand and your pre-production team ready for action. Don’t freak out: you just need to organize what you need for each scene. This is called a scene breakdown (or “script breakdown” if you’re breaking down multiple scenes). A script breakdown is typically made by the 1st AD or Producer.
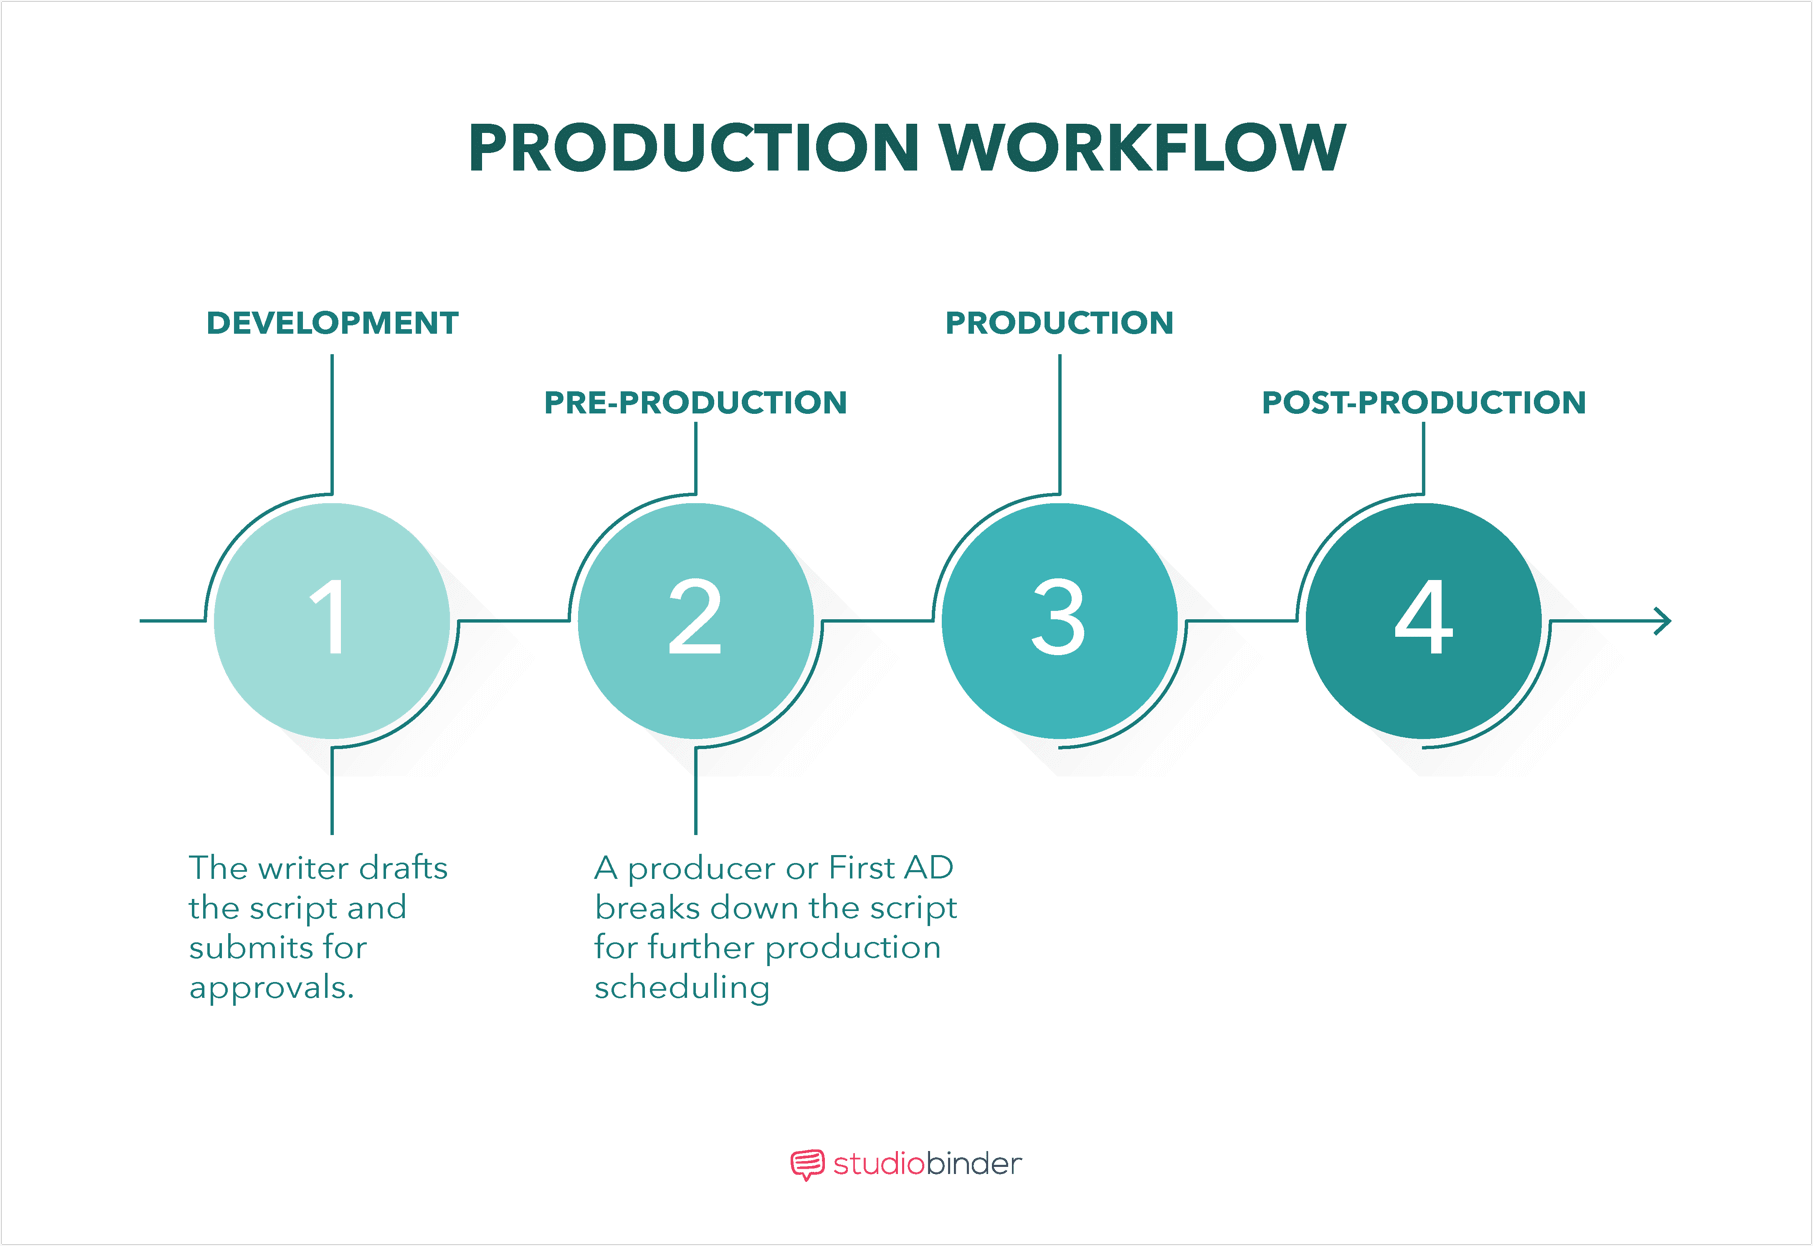
A script breakdown is made to kick off pre-production.
You will need each scene breakdown to keep track of your cast members, props, and objects (also known as “scene elements”). You’ll use it to guide your pre-production and production scheduling.
I used one for my short film Stream: a Netflix Original Trailer Parody. The shooting script had just ten scenes but my scene breakdown revealed the many intricacies of what was needed. Thankfully the process of creating a scene breakdown is straightforward with the right tools and preparation.
StudioBinder - Script Breakdown Software
Breaking down a script requires focus and creativity, but it will all guide your next steps. The elements you have identified and broken down will help you create your budget, stripboard shooting schedule, shot lists and storyboards using StudioBinder’s tools.
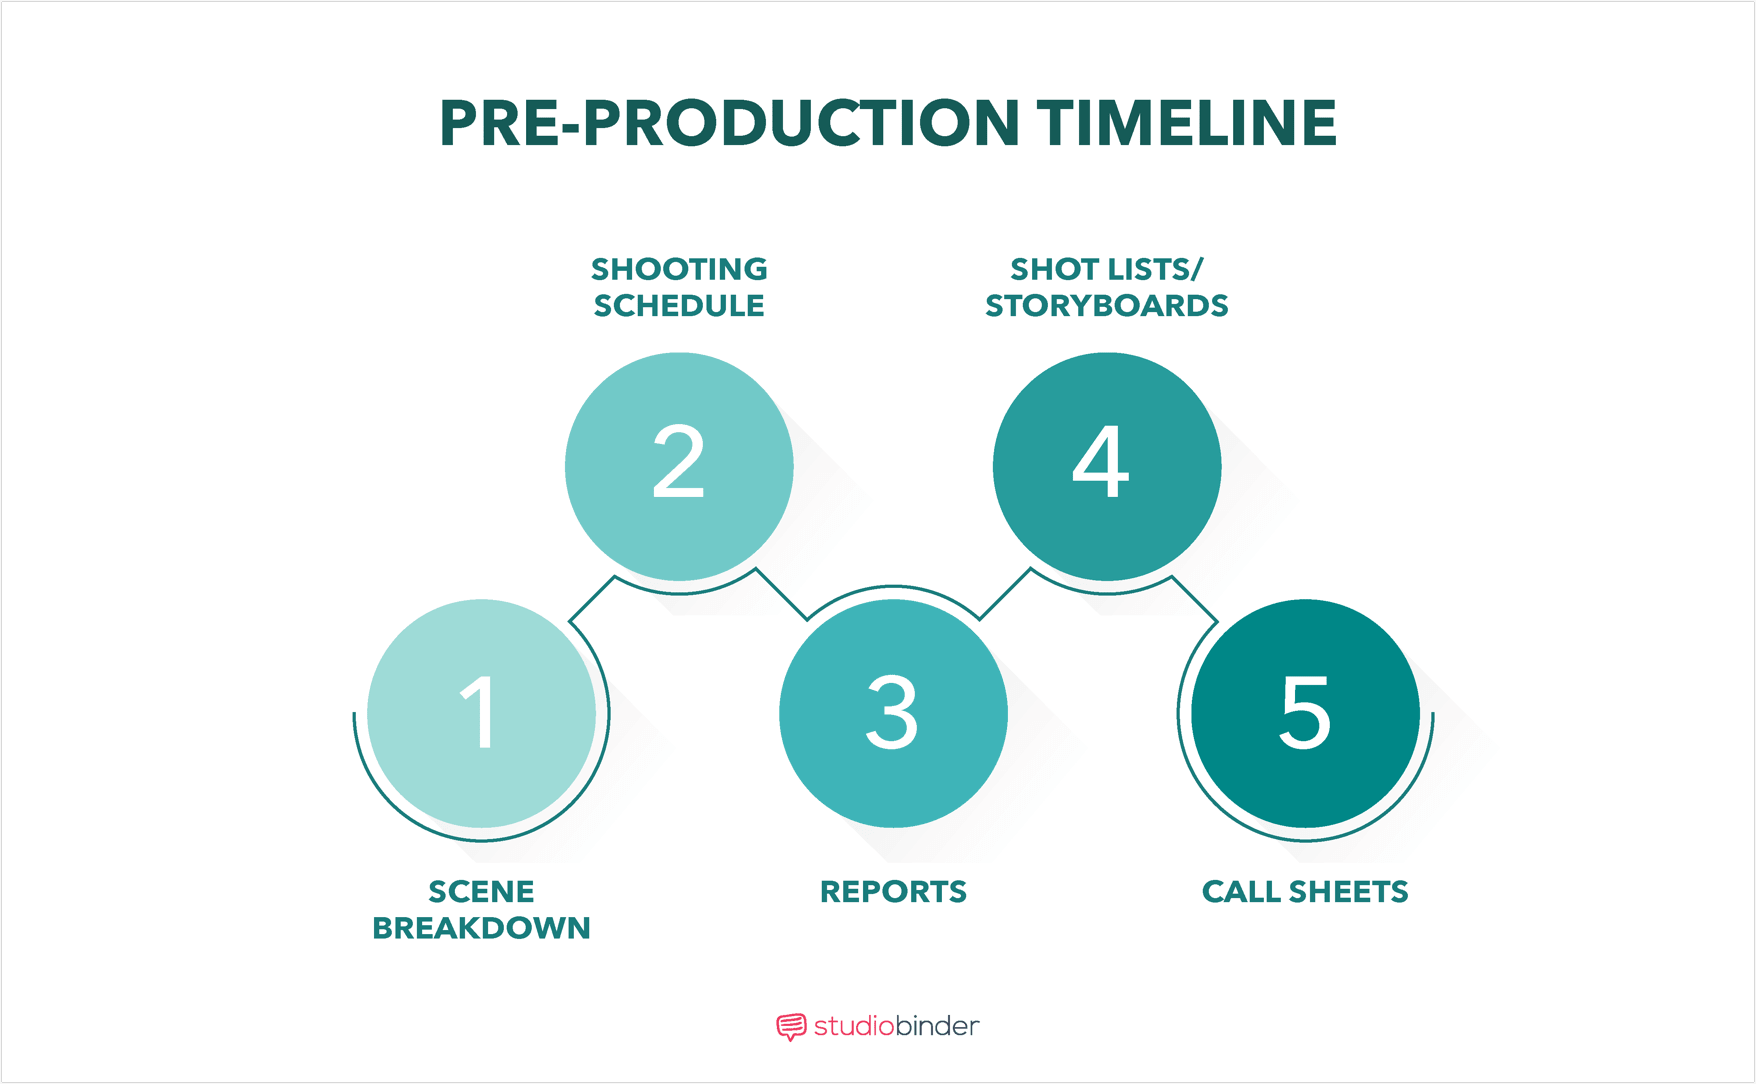
Breakdown will inform all of the pre-production steps to follow.
script analysis
2. How to do a script analysis?
The first thing you'll need to know before breaking down your script is if it’s ready to digest.
To do this, first, confirm with the writer whether the version you have is the final "shooting script" or at least the most polished draft available. Even if you are the writer, you may still need approval from various collaborators to finalize the shooting script. If you are not a writer, there are useful posts that can help you build a good relationship with him or her while carrying out this process.
Once you’re solid on your shooting script, read it as though you've never read it before. Then read it again.
And again.
When breaking down a script you must read it from both creative and technical perspectives. You'll prevent potential issues if you think critically about what each scene needs before you get started.
Always remember to read between the lines. Sometimes necessary scene elements are not called out in the text of your shooting script. For example, we needed a big-screen TV and a remote control. Since we wanted the remote to light up when used, we also needed batteries. This can all be accounted for when by visualizing your scenes as you read.
Next, analyze the quality of the script formatting. Are the slug lines, characters. and actions formatted correctly? Is the naming consistent? If you're using a free script breakdown software, whether it’s Mac or Windows, you'll want to ensure the script parses correctly.
pro tip
Refer to a good formatting guide to ensure your script is ready to be parsed.
scene breakdown
3. Uploading scripts to break down
With your formatted shooting script in hand and your sense of scene elements in mind, you're ready to begin.
First, upload your script into StudioBinder. You can do this in the document page or even in the shooting script section. Once it's uploaded, you simply go to the right sidebar, and hit "breakdown."
There is another way to access the script breakdown and that is directly from your shooting schedule. If you go to the right side of the strip, there is a breakdown icon waiting for you.
Click the breakdown icon as this screenshot shows:
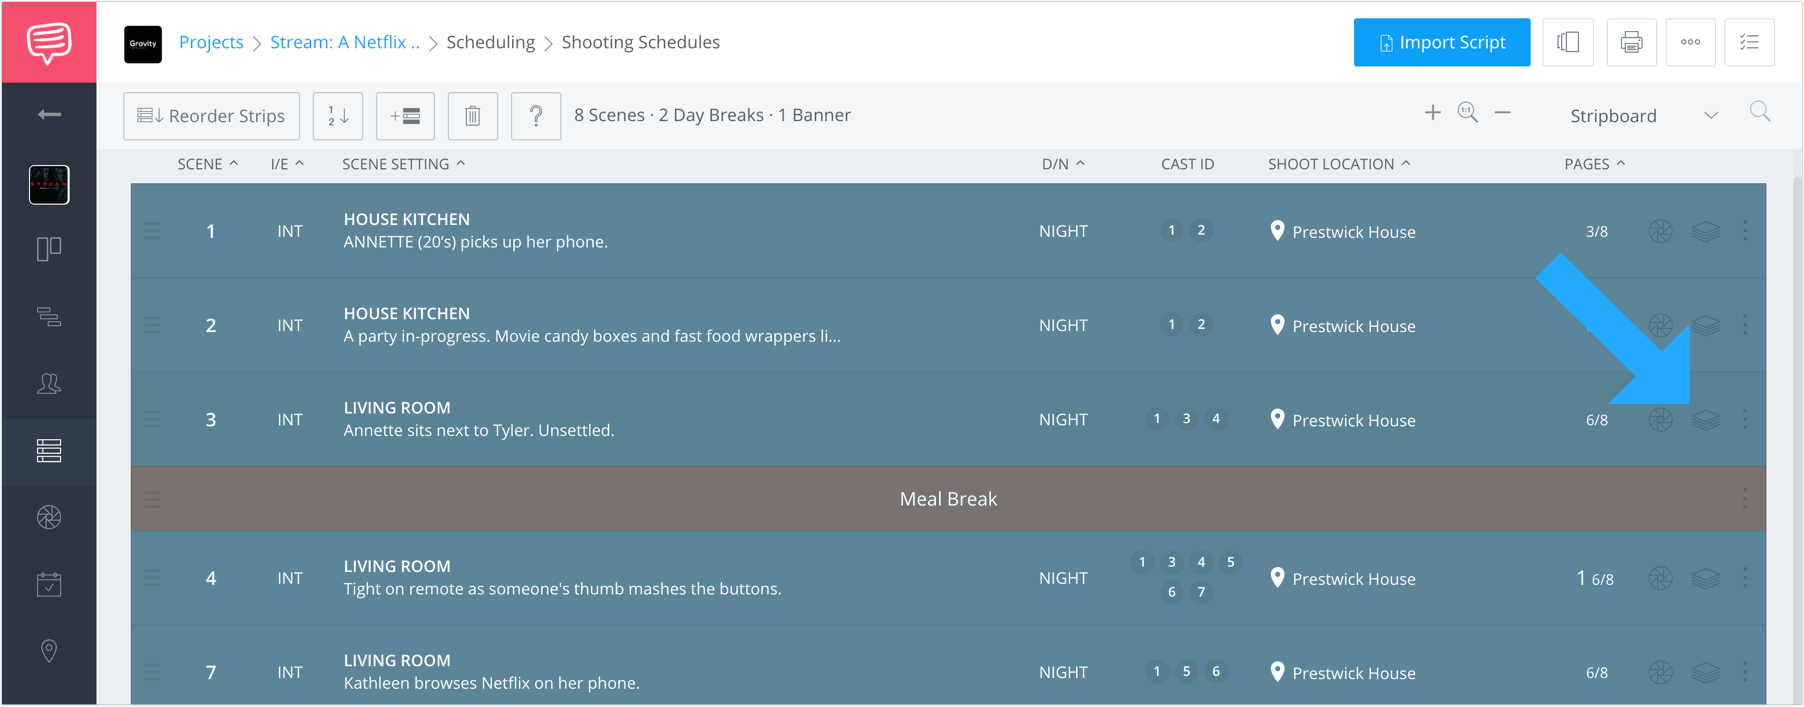
Locate the breakdown icon
In the production world, each script page equals roughly one minute of screen-time. As a result, fractions of a page equal fractions of a minute on-screen. Each page (or minute) is further broken down into 1/8ths of a page. These page 8ths will ultimately help you understand the shooting time per scene.
If you’re breaking down a script by hand, you’ll need to find a ruler and start dividing every script page into 1/8ths (eight one-inch rows).
Tedious? Yes.
Luckily, when you import your screenplay file into a script breakdown software like StudioBinder, the pages will already be fractioned out for you so you’ve already saved a bunch of time.
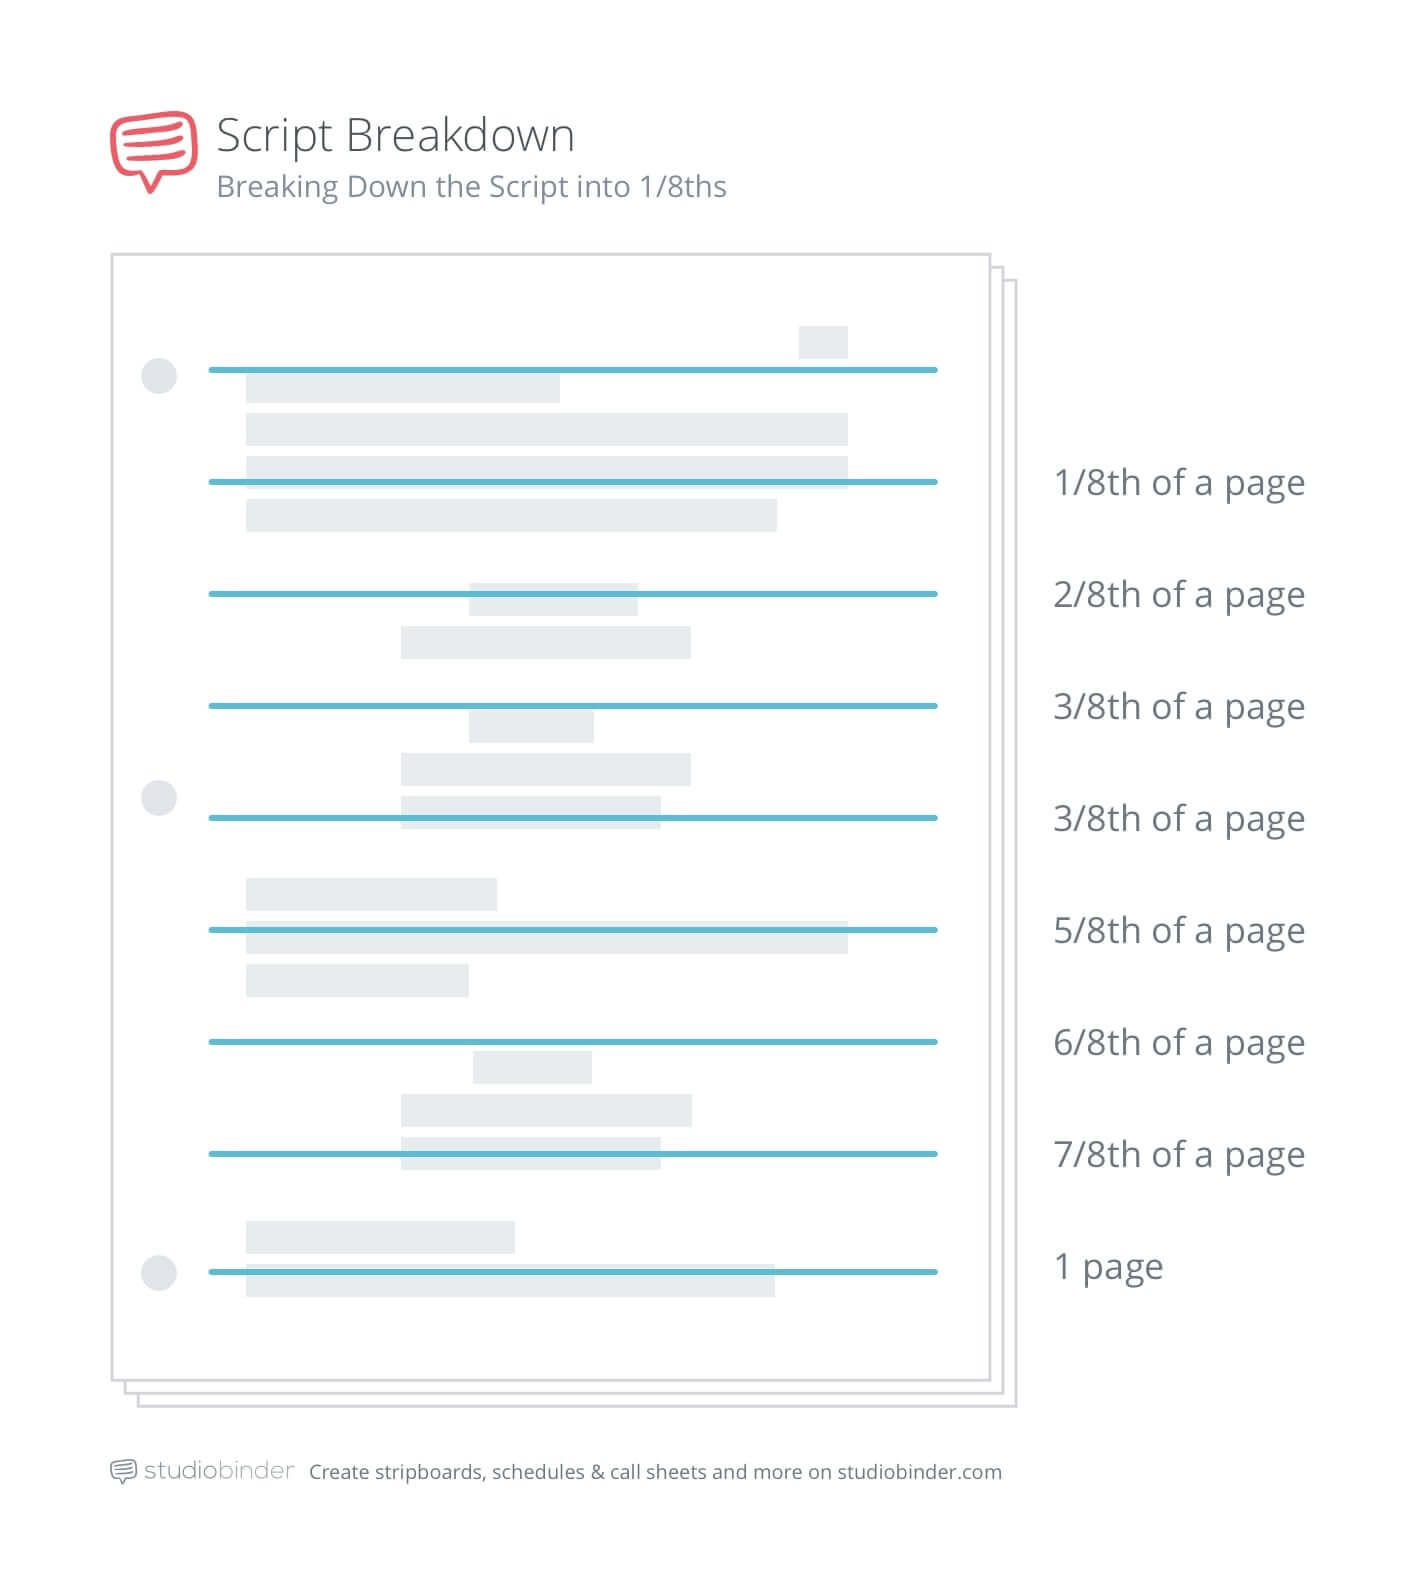
Divide the page into eight, 1-inch parts.
After importing, you're ready to start breaking down your script. To do this, you’ll need to categorize each scene element by color.
Related Posts
breaking down a script
4. Breaking down and tagging
Free script breakdown software like StudioBinder allows you to import new screenplay versions as they come in. But it is still best to start with the latest draft possible to avoid rework down the road.
Before we get into the specifics of the software, let's get a bird's eye view:
Script Breakdowns
Let's jump in.
Tag Elements
You’ll need to think critically about how you want to tag your elements. Which categories will you use? If you’re creating a breakdown manually using script breakdown template, you’ll need to consider which colors you’ll assign to every category too.
StudioBinder’s script breakdown software automatically updates the colors of your script selections into industry-standard script breakdown colors that represent various categories.
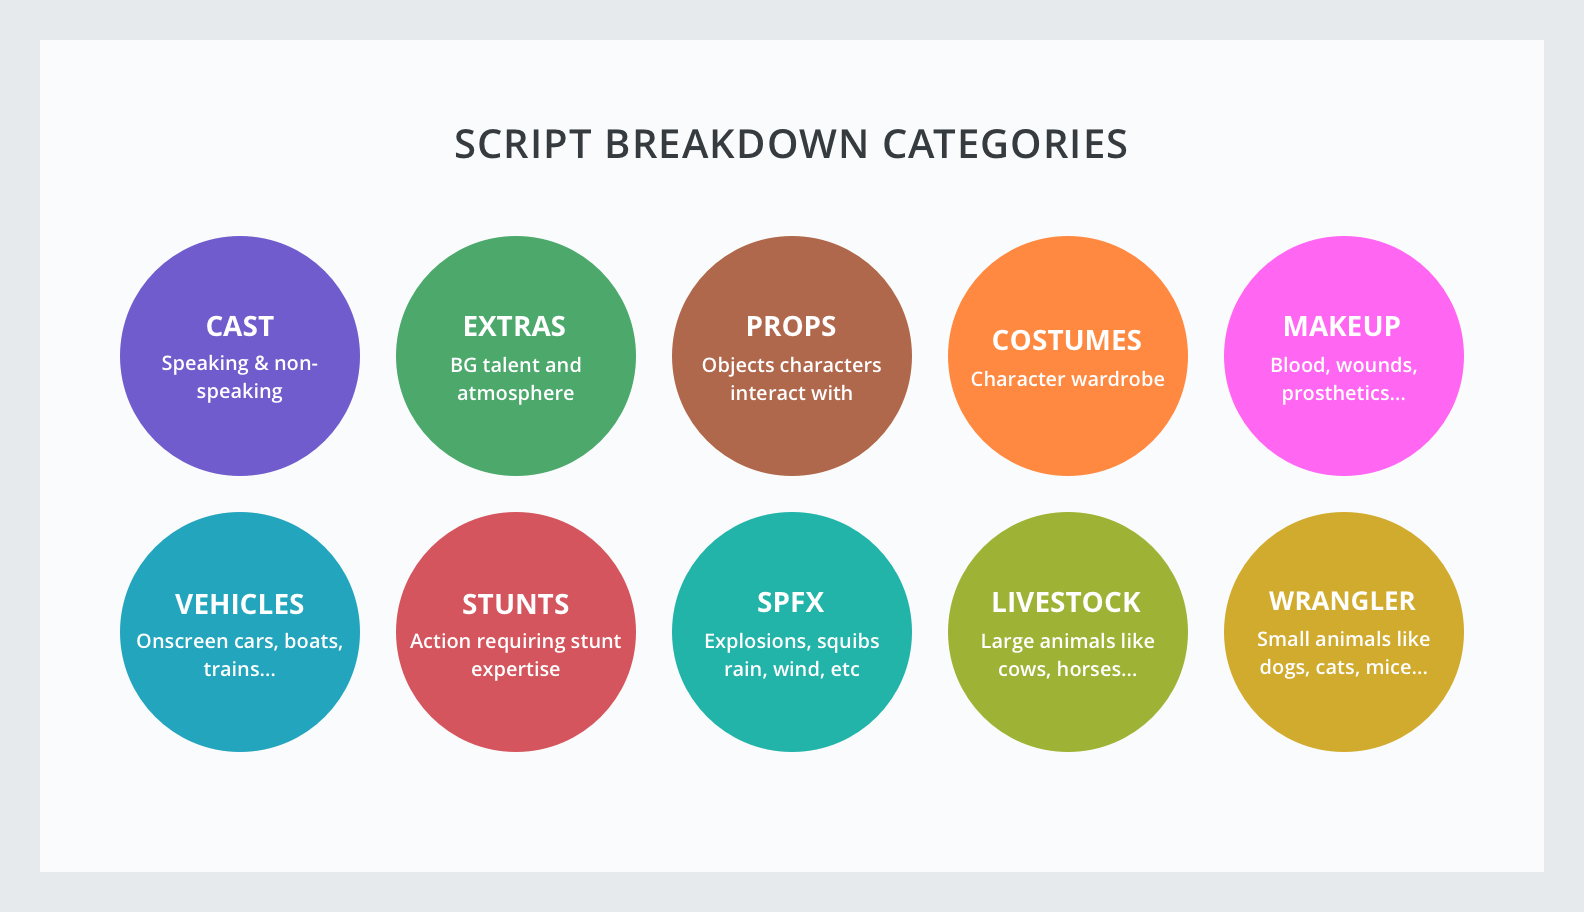
Every scene element category should have its own color.
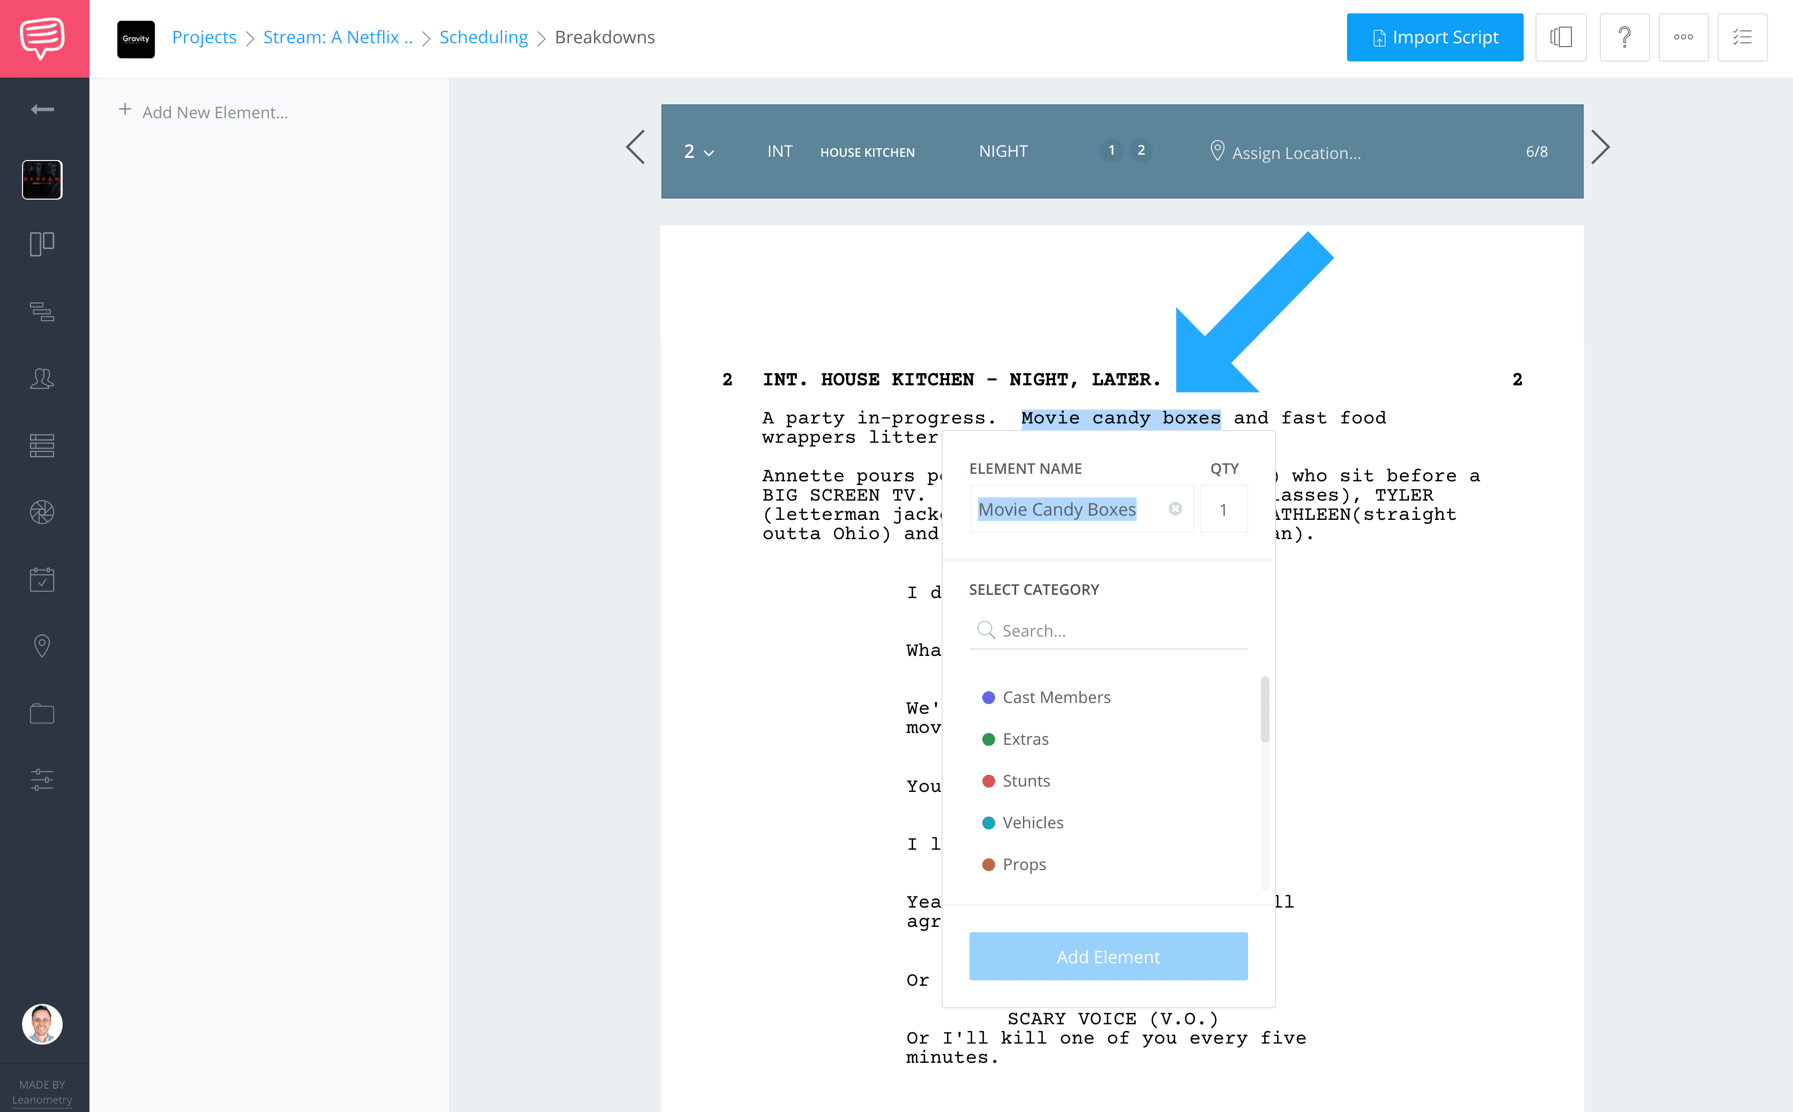
Just navigate to your script and highlight the element word or phrase you want to categorize. A category tagger will drop down.
Browse or search by category names until you find that best option that represents your scene element.
Select the category in the list.
PRO tip:
When tagging elements you can name them differently from the script if you want. For example, if the script spells out a ‘93 Camry, but any old car will do, you can retype the element name as “Old Car” instead. Although ‘93 Camry will be tagged in the script content, it’ll show up in your production reports as “Old Car.”
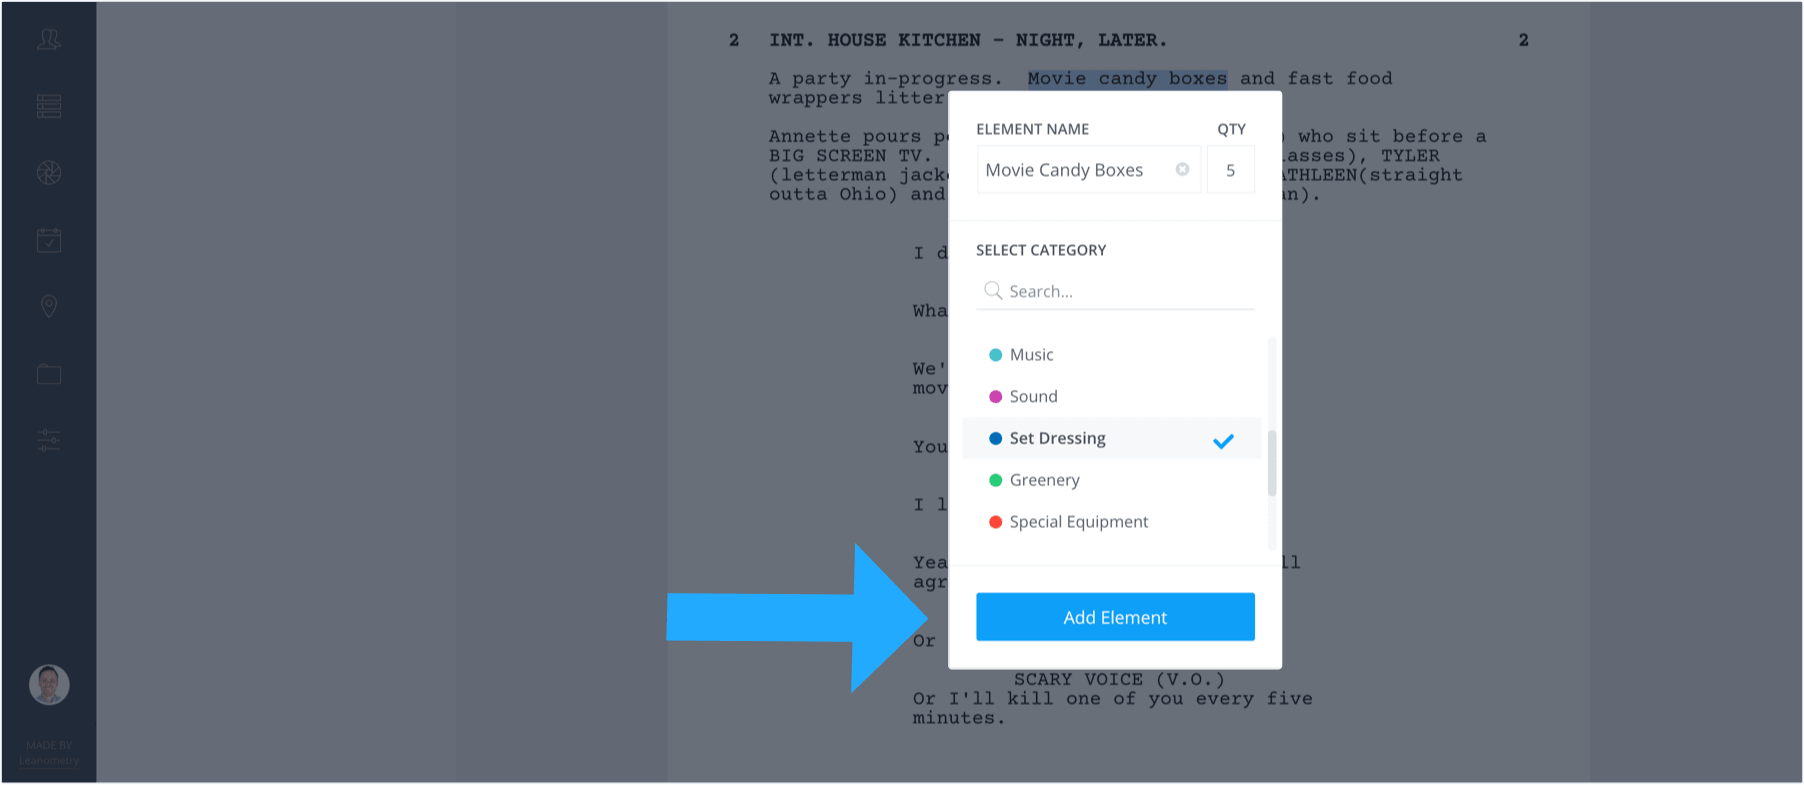
Additionally, consider how much of the element is needed. Use the Quantity field in the category dropdown to specify. The script calls for “movie candy boxes”, which implies a variety. Here, I used a quantity of 5 to be safe.
My suggestion is to err on the side of “more” with the quantity field. Having a variety of options can be very helpful to those responsible for visualizing the scene. The quantity of the scene elements you need is essential so use your breakdown to plan ahead!
pro tip:
Be very careful when breaking down your script as some scene elements have overlap. For example, on “Stream” we used both practical and computer-generated gore effects. I distinguished between them with separate scene elements to help me prepare.
When you’re done, click the Add Element button. You'll see the corresponding Element added to your Elements list on the left column.
And that’s it!
You’ve just tagged an element.
Not too bad, right?
Remember that specificity is key when breaking down a script. Make sure the category you select best represents your scene element.
For example, the “movie candy boxes” referenced in my script – Your first inclination might be to label it as a prop. But because a prop is defined as a physical object that the actor interacts with, this element is technically considered as Set Dressing.
scene breakdown
5. Assign characters and locations
While breaking down your script, familiarize yourself with the scene strip at the top of the page. You will use it to jump between scenes, assign characters and locations and also see your scene’s page length (in 1/8ths).
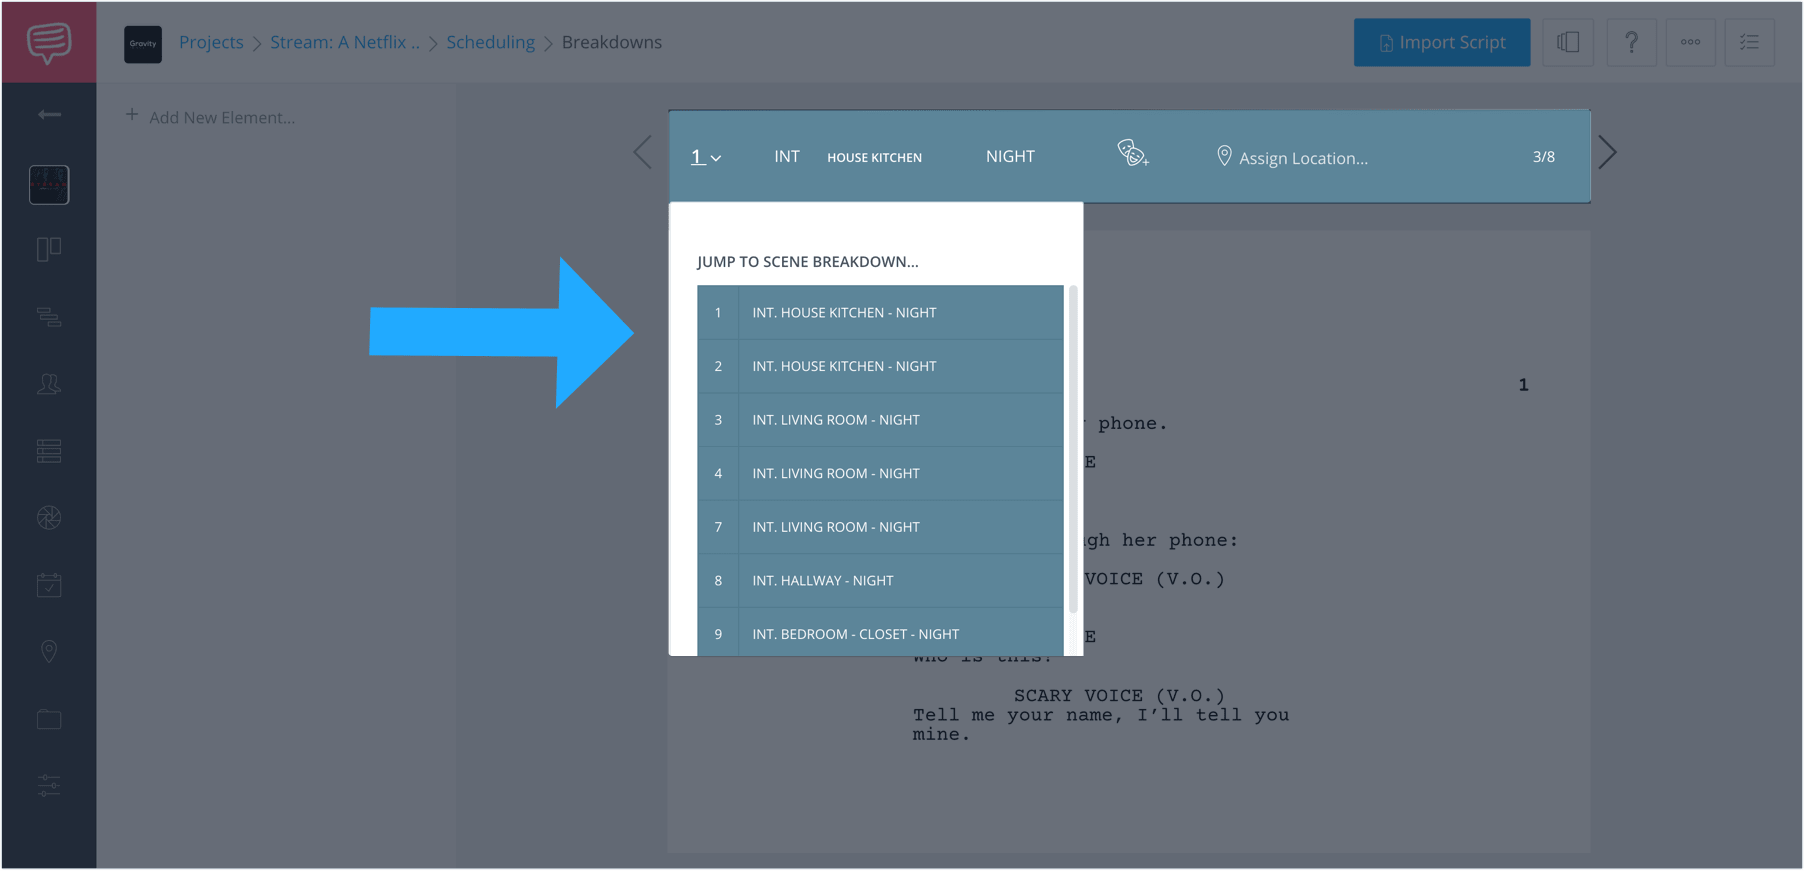
The StudioBinder scene strip
Click the arrows to the right and left of the scene strip to jump between scenes. You can also click on the scene selector to go to a specific scene.
This is also where you will assign characters to your scene. Characters are automatically assigned if they have dialogue in the scene. However, if there is a non-speaking character in the scene, you can assign him or her here.
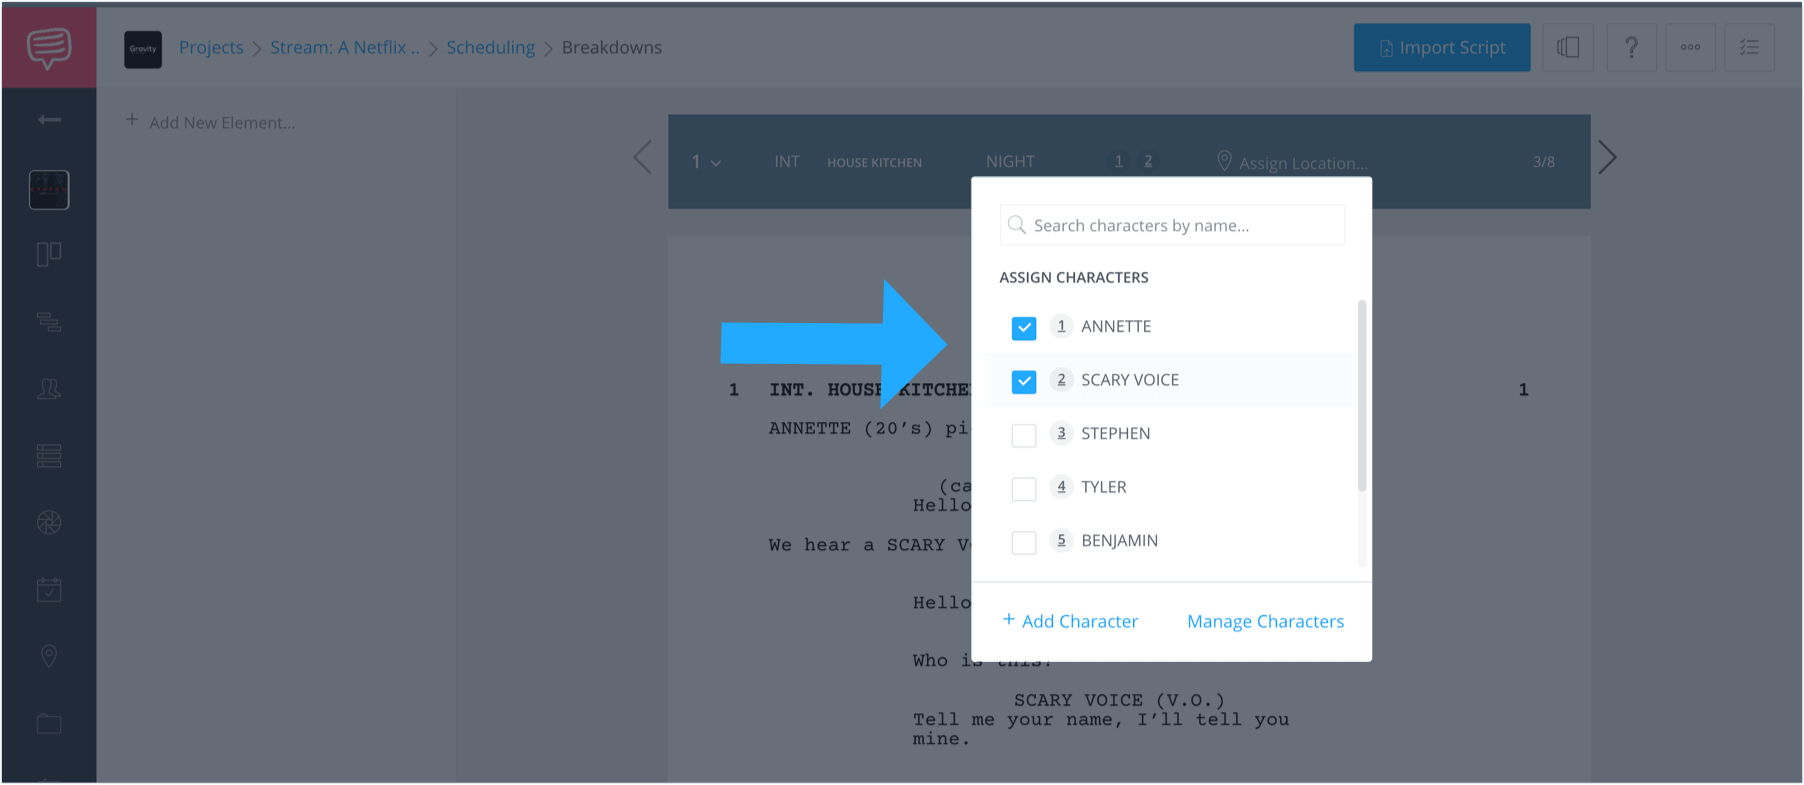
Assign characters in the scene strip
You can also assign shoot location here in the scene strip. This will feed into your shooting schedule, call sheets, and production reports.
Pro tip:
After all your scenes have a shoot location assigned, you can auto-reorder your scenes by location to create a shooting schedule in StudioBinder. So assigning locations now will save you a huge amount of time when building your schedule later.
No location secured yet? No problem.
Click the “Add Location” and name it something generic for the time being (e.g. “Prestwick House”).
You can always come back and assign a physical address to an existing location later on and StudioBinder will update all of the scenes for you.
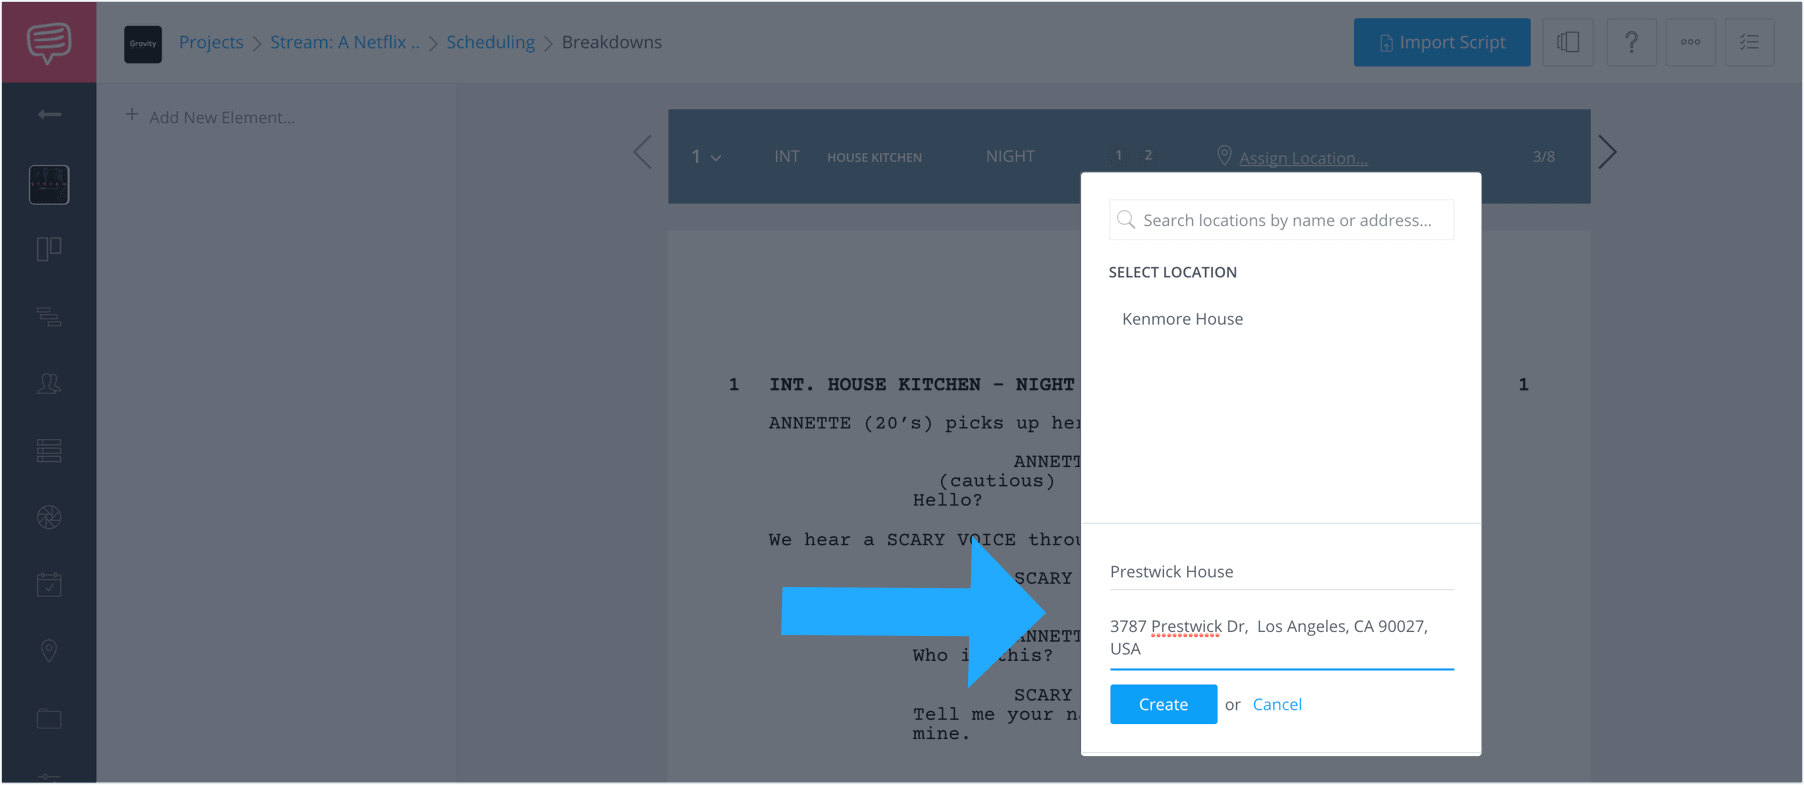
Assigning a Location in the scene strip.
Also note that your scene length is located in your scene strip as well.
Related Posts
screenplay elements
6. Manually add new elements
Remember also that not all scene elements are specified in the text of the script, but you know you’ll need to acquire it for the scene.
Luckily, we have you covered.
Simply go to the sidebar, and click the "Add New Element" button.
Then manually type the element name into the category dropdown.
Scene breakdown notes
7. Add notes to your scene elements
Additionally, if you would like to add notes about your scene elements, be sure to use the Scene Notes text box directly beneath the script.
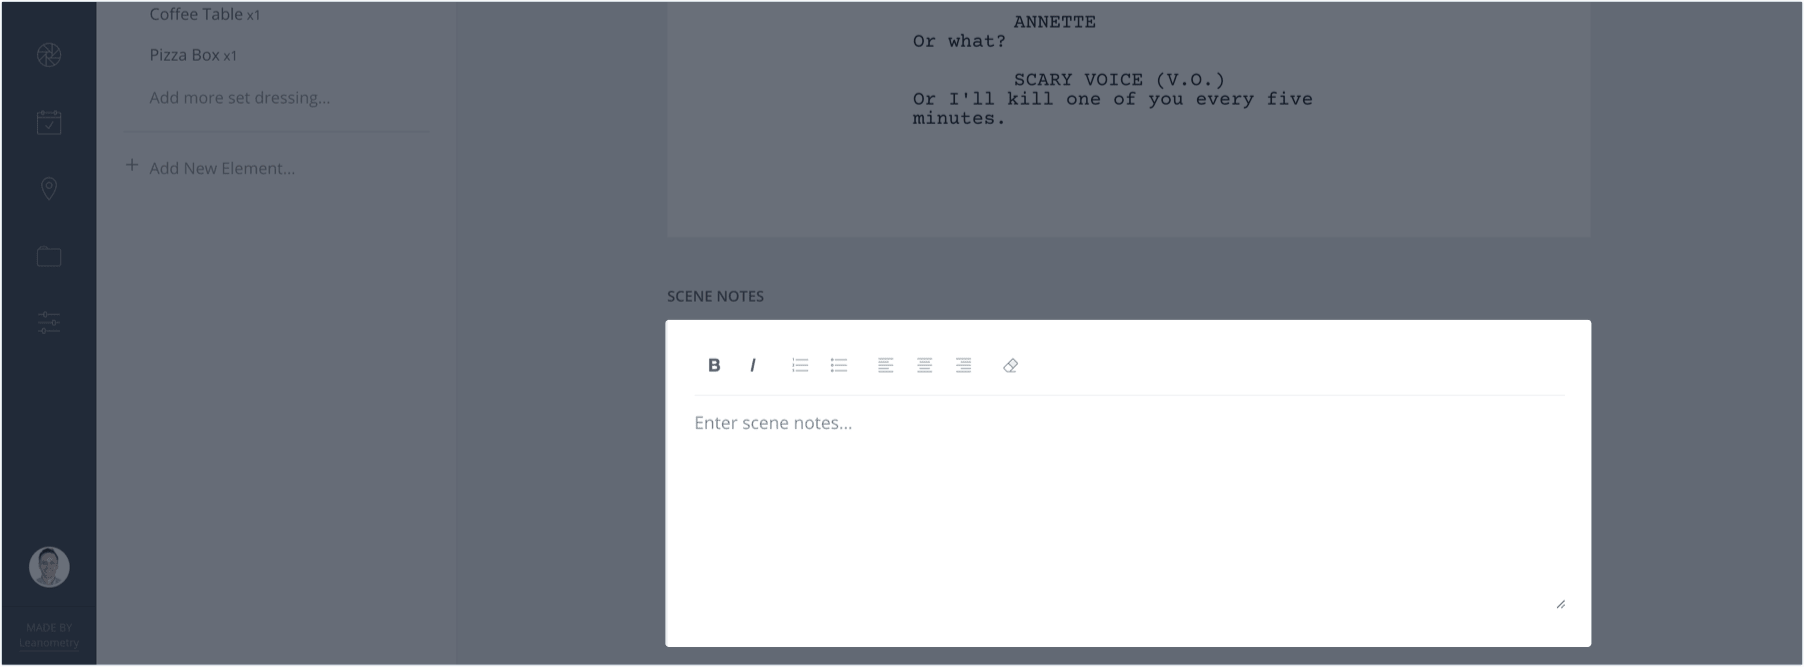
Scene Notes keep track of granular details
PRO TIP:
Use Scene Notes to elaborate on scene elements that require special handling or instructions. For example, if you’re using a drone for filming you might want to elaborate on the drone regulations, requirements or added setup time here.
task management
8. Create tasks and collaborate
Use the Tasks sidebar to keep your collaborators in the loop as you go.
Caption goes here...
For example, you may not know how a particular scene element should be implemented. To discuss with your collaborators, click on the Task Cards button.
This will open up the Task Cards sidebar. Click “+” to add a new task card.
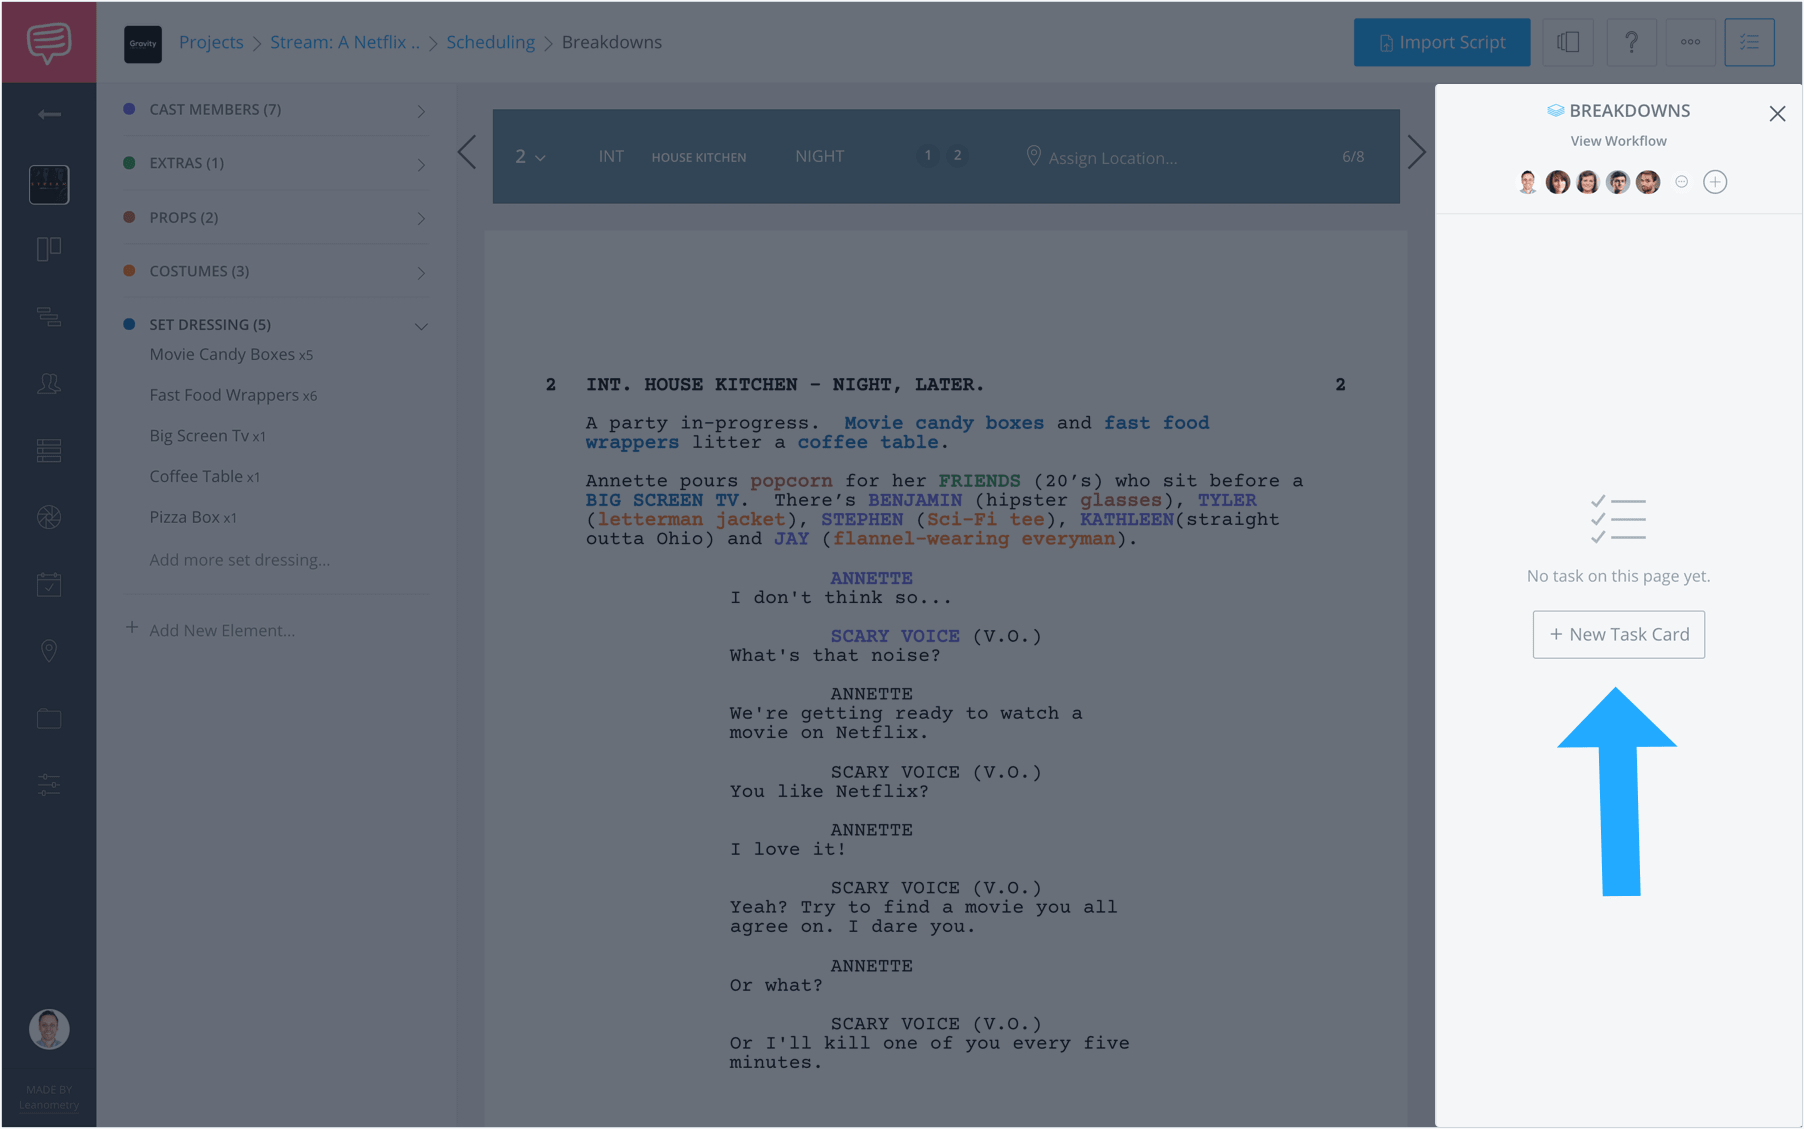
The Task Cards sidebar
After you type in a task name, click on it or hit Enter. A pop up opens with oodles of details you can fill out: tasks, due dates, file attachments, comments and teammates you can assign the card to.
Most importantly, add tasks to outline the steps you want your teammates to take to address a particular element or scene requirement.
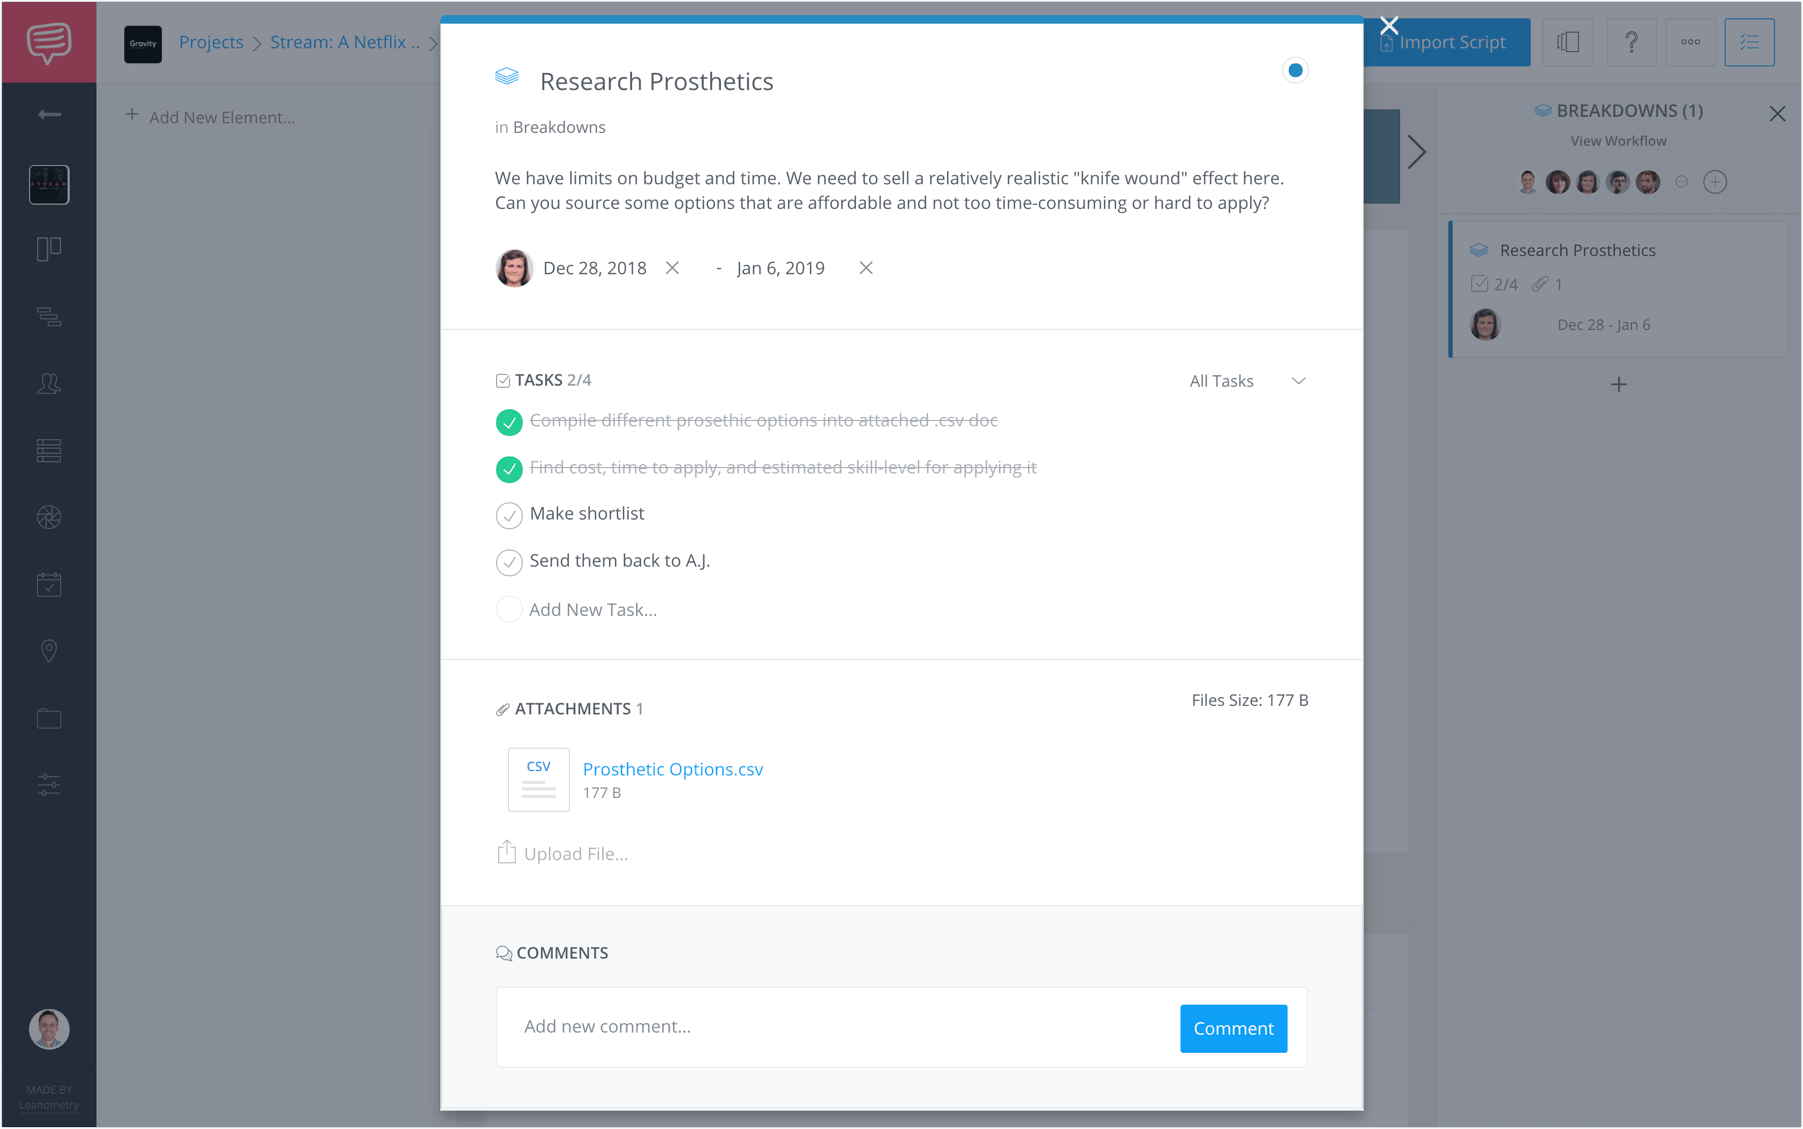
Assign tasks to department heads
PRO TIP:
Don’t forget to assign a status for your task with the Change Status button!
Your card will now appear in your Task Cards sidebar. Note that your task now retains the color of the status you set.
All of the task cards (across the various StudioBinder pages) aggregate on the Workflow dashboard’s status columns so you can quickly identify which cards are on hold, in progress, needs review and completed.
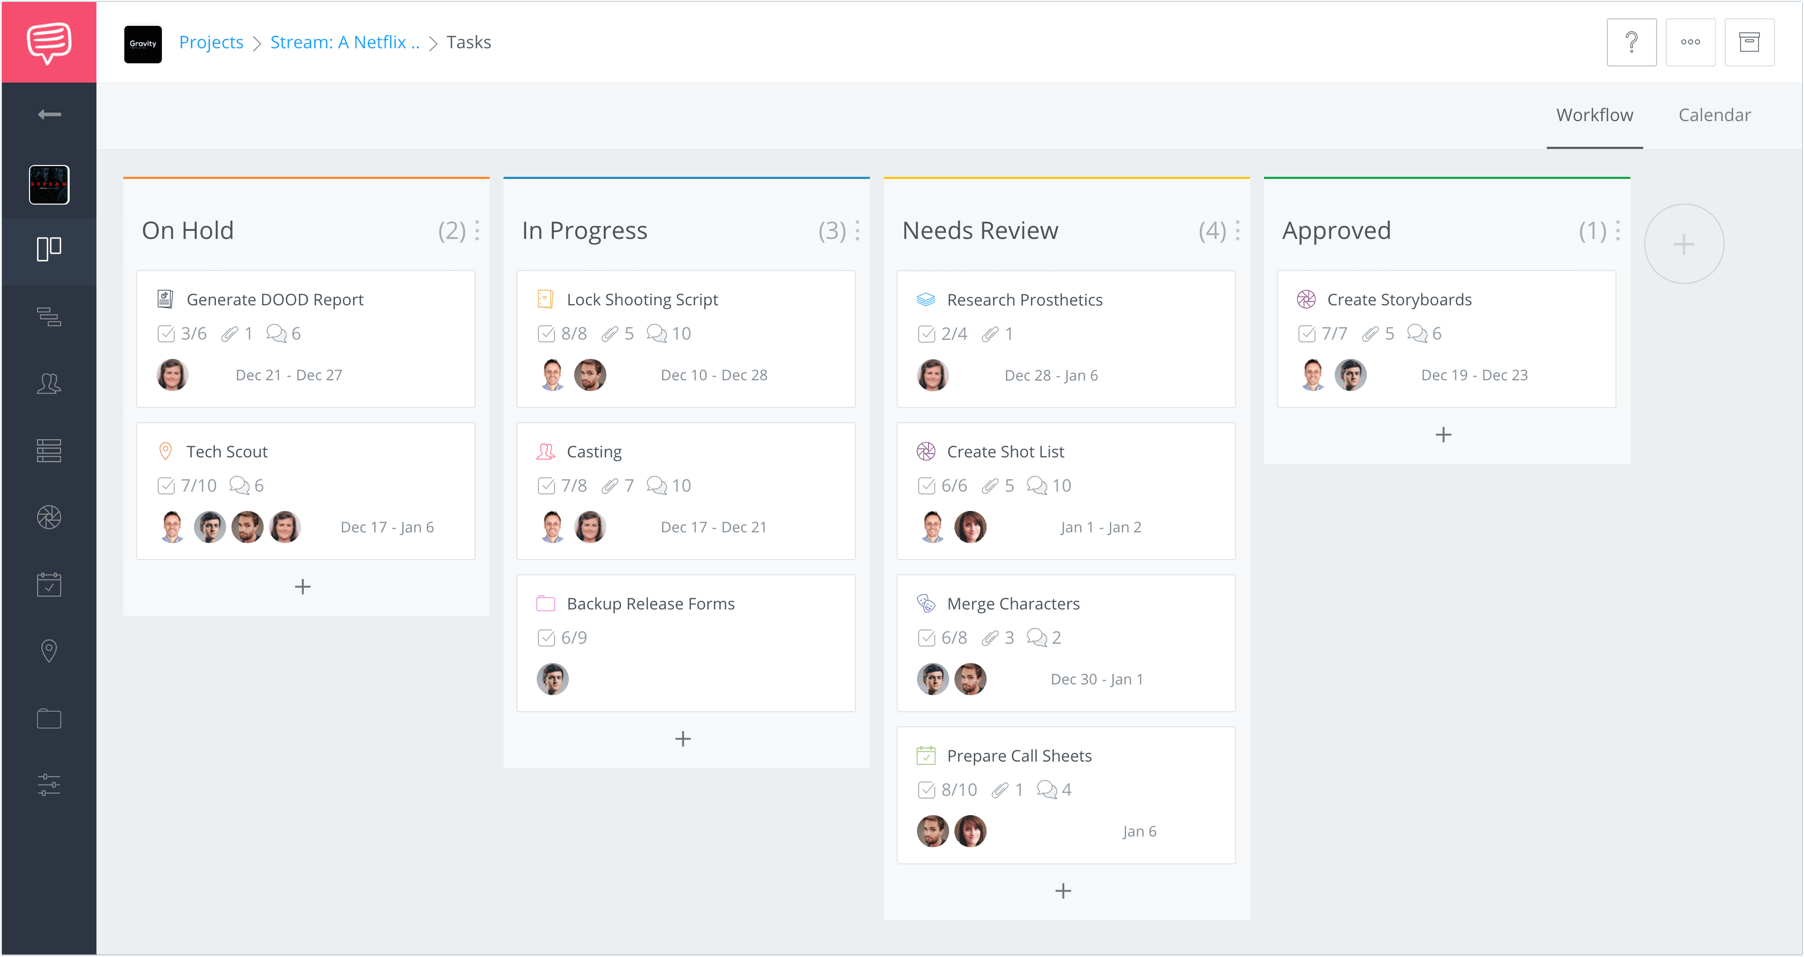
All task cards aggregate in StudioBinder’s Workflow dashboard
production reports
9. Script breakdown reports
With all scene elements tagged and categorized, you're now ready to create your script breakdown sheets.
Traditionally, you’d need to find a scene breakdown sheet template for Excel or Google Docs, and populate them manually for each scene. Using this method, you’d need to transfer all of your color-coded elements to sheets for every scenes.
Prepare for a lot of copy-and-pasting.
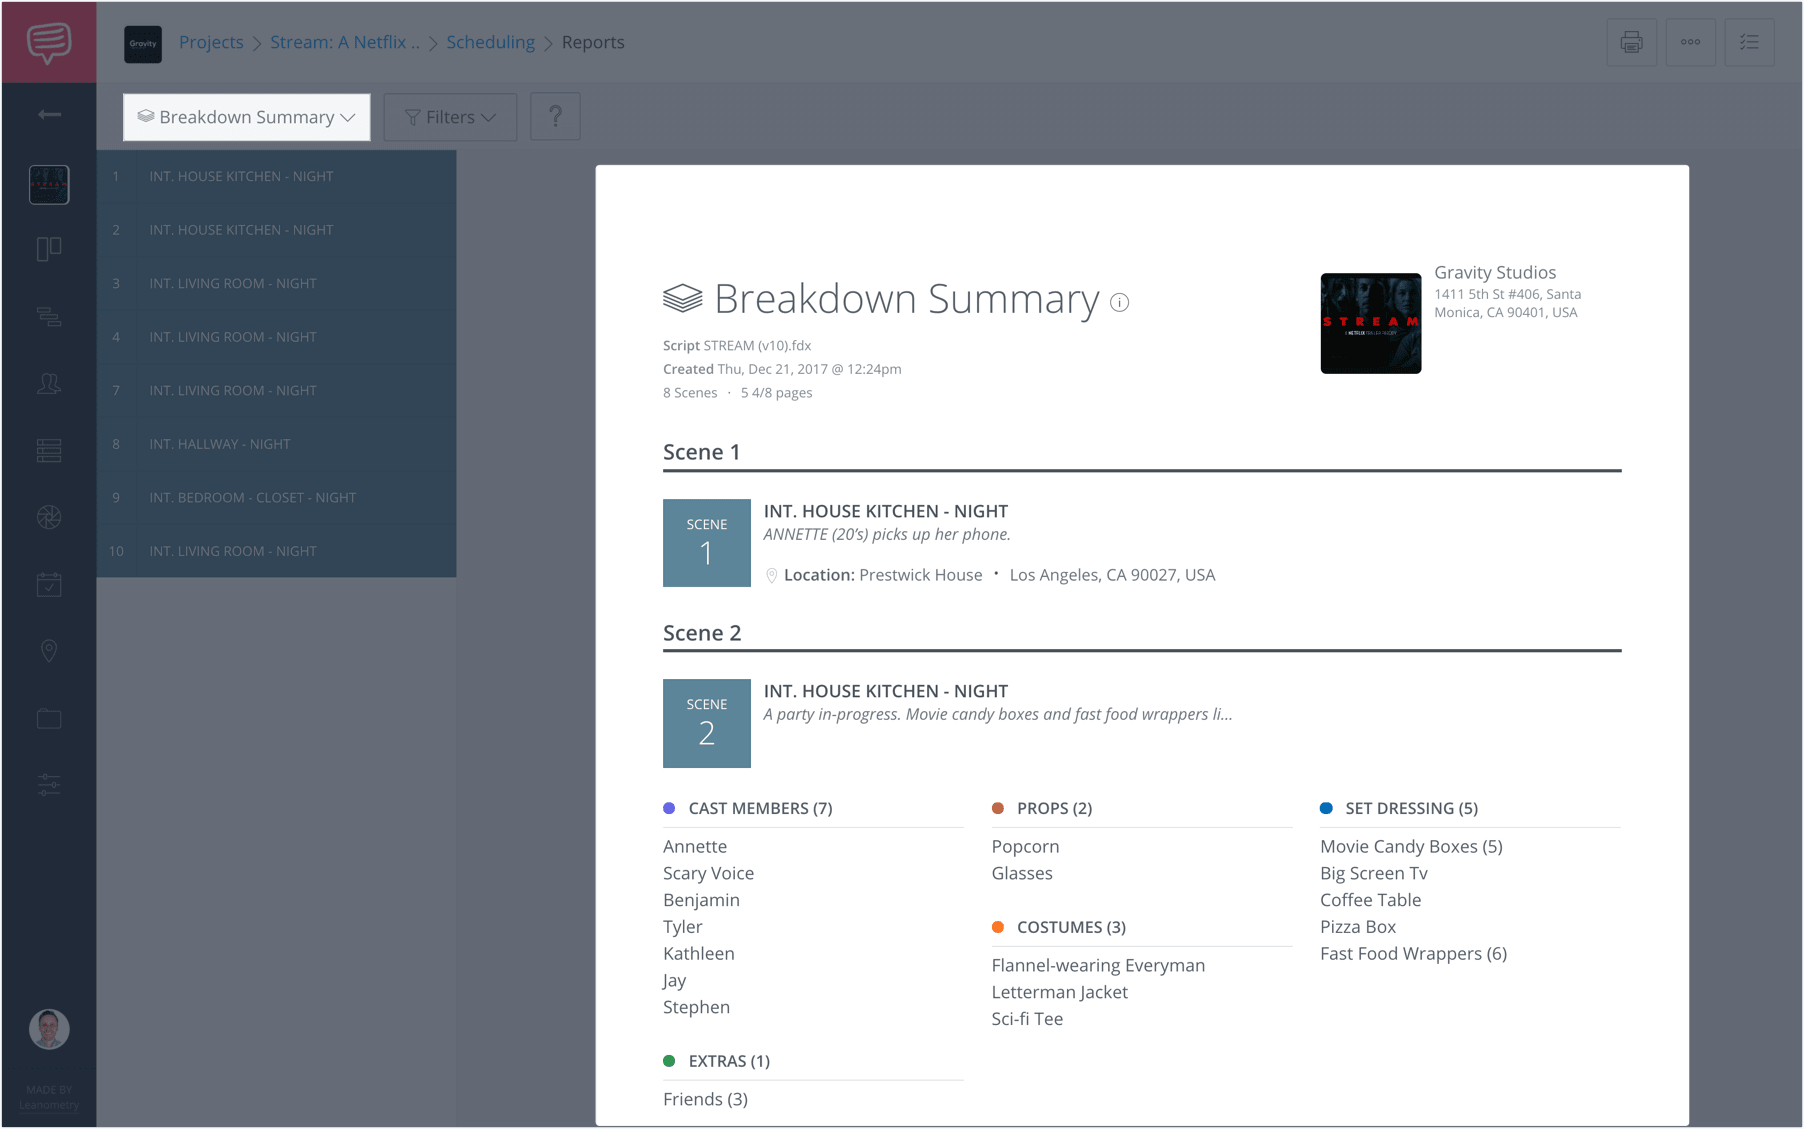
Fortunately, StudioBinder’s script breakdown software automates this for you. Just navigate to the Reports page. This will list each scene, a brief description, the location, scene notes and all the scene elements you have tagged.
You can customize your reports as you see fit using the Filters button up top.
For example, if you don’t want to show your Scene Notes to external parties, just uncheck uncheck it in the Filters dropdown. After that, you can share the page with collaborators (non-StudioBinder users), print or save the page as a PDF.
It’s a good time to check your work now that all of your scene elements are in your reports.
Speaking of reports, there are 4 valuable breakdown reports you’ll want to share:
1. BREAKDOWN SUMMARY REPORT
Use the Breakdown Summary report to see an overview of all the scenes and their respective elements and scene notes. Use the scene navigation sidebar to drill down by scene.
Are the props listed actually props and not set dressings? Will they require multiples? You get the idea.
2. ELEMENT LIST REPORT
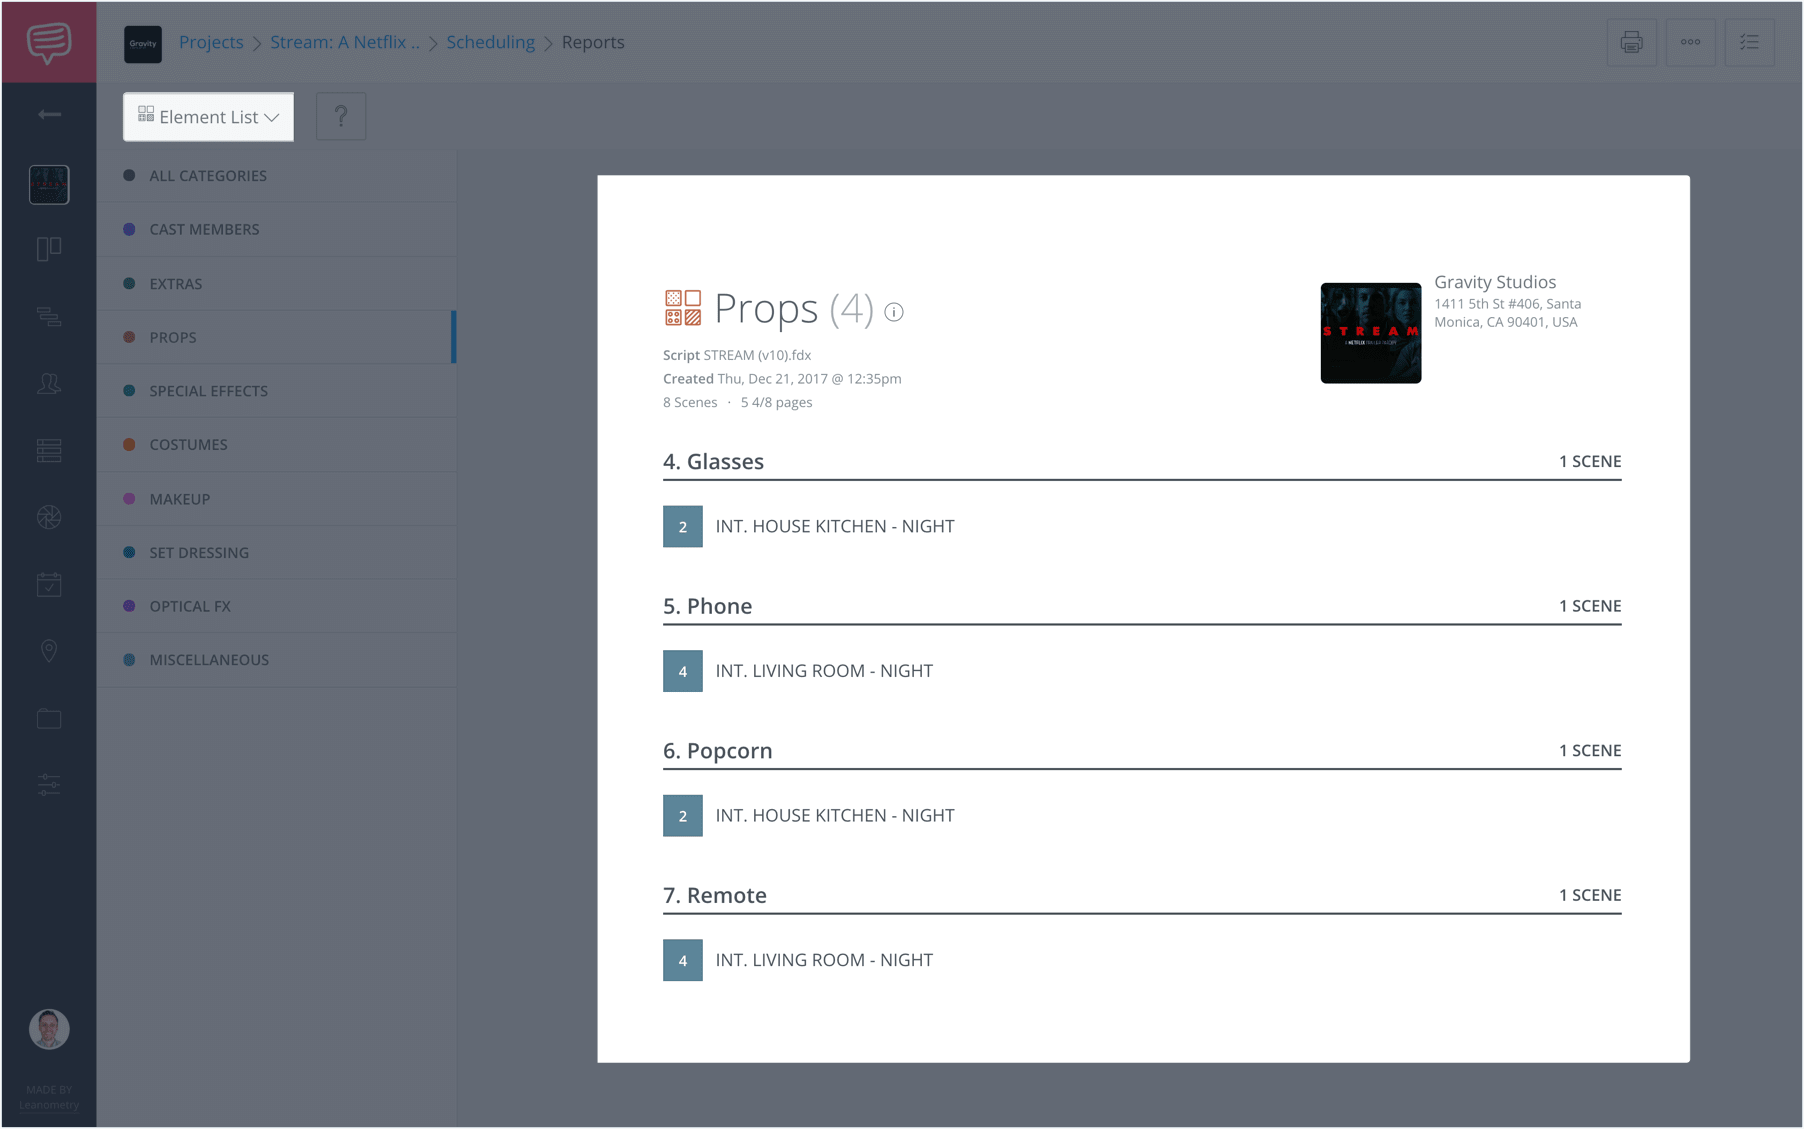
The Element List is a master list of all your tagged elements. The scenes that the element was tagged in will be listed below it. Make sure these match the intentions of the shooting script.
In this specific case, let's say I just want to print out my prop list. To do this, I just clicked on the Props category on the left and voila!
3. UNIQUE DAILY ELEMENTS REPORT
This report assigns your scene elements to the shooting days they’re needed for. Note that you’ll need to create a shooting schedule with day break before this report can be generated.
Use the filters to drill down by shoot day. You can also narrow down by element categories by clicking on them in the sidebar.
4. DOOD REPORT
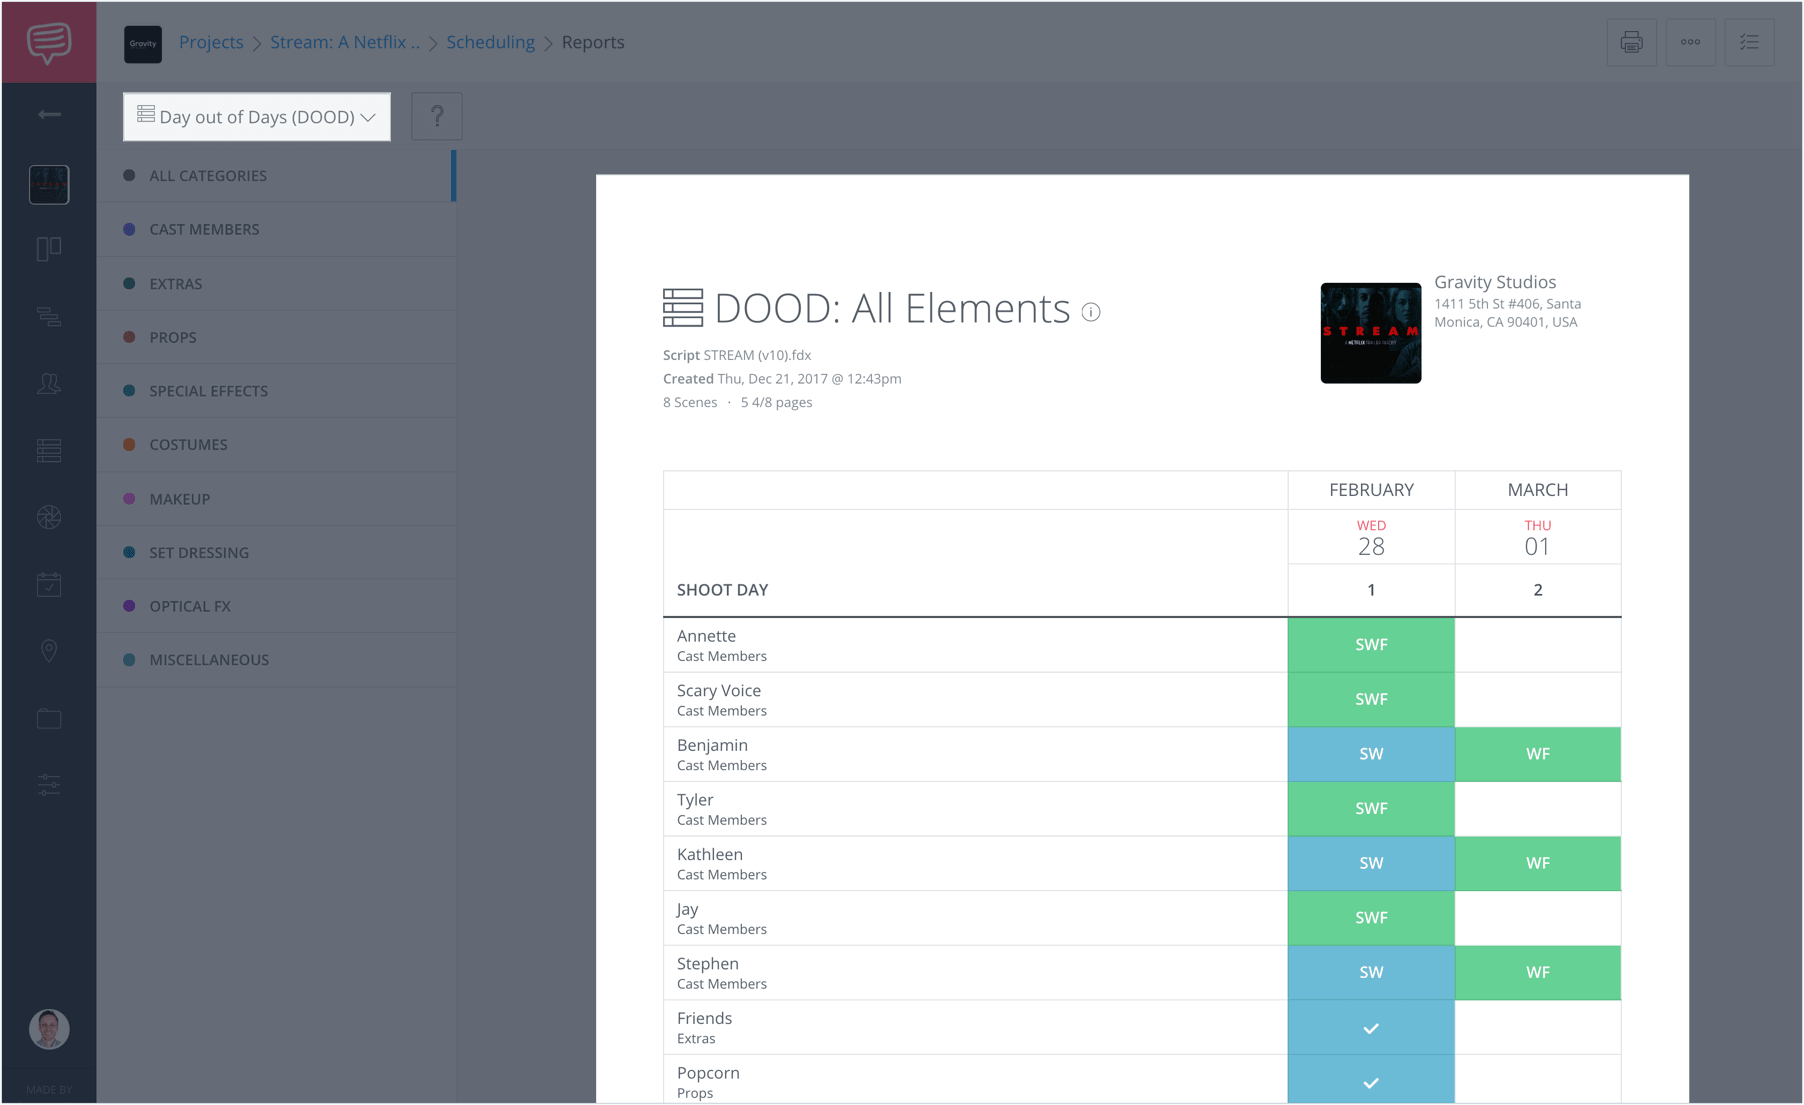
The DOOD (“Day out of Days”) Report shows your actors’ work days over your shooting schedule.
DOOD Reports show when your actors start (“S”), work (“W”), or finish (“F”). For example, an actor that has one day of shooting would be labeled as “SWF” on that day.
Other scene elements that will be required that day be listed as checkmarks.
Like in the Unique Daily Elements Report, you can narrow your DOOD report by specific scene element categories desired.
Related Posts
Up Next
Pre Production Process Explained
If you are thorough, detailed and creative with your reporting of the scene elements, you will have a very actionable report to advance to the next stages of preproduction and production.
Although using free script breakdown software like StudioBinder will get the job done much quicker.Just imagine doing all of this manually across hundreds of spreadsheets. Yikes.
Up Next: How to Produce a Movie →
Easily create script breakdown sheets online.
Import scripts. Tag elements like props, wardrobe, and cast. Create breakdown summaries and DOOD reports in a snap.
