Modern film professionals are living and working in the midst of a golden age for audio-visual content production. Tools to streamline the production process are more advanced than ever and producers no longer have to rely solely on themselves.
In today’s article we’ll cover the basics of the DOOD Report, and why we need it. We’ll discuss how it can determine a great deal about our production, and help us cut costs in areas we didn’t previously realize. We’ll use StudioBinder to do it. Let’s get organized and see how to figure out what the heck we’ve been spending our money on.
Quick Overview
1. What’s a DOOD Report?
When scheduling a film shoot, there are a ton of moving parts and it’s up to you as the producer, or 1st AD, to manage those moving parts. One of the most expensive of these parts?
Cast.
Whether you have top names, or are on a super low budget, knowing which actors you need when, could help save you a ton of money, and ultimately, determine how smooth your shoot days are.
We can stay on track with the DOOD Report.
Dood Report Definition
What is a dood report?
Short for Day Out of Days, the DOOD report is a chart that marks your actors’ “works days.” It’s used as an organizational document to keep producers on board with where their money is going.With actors having such busy schedules, a Day Out of Days report makes sure the actors are being used (and paid) as efficiently as possible.
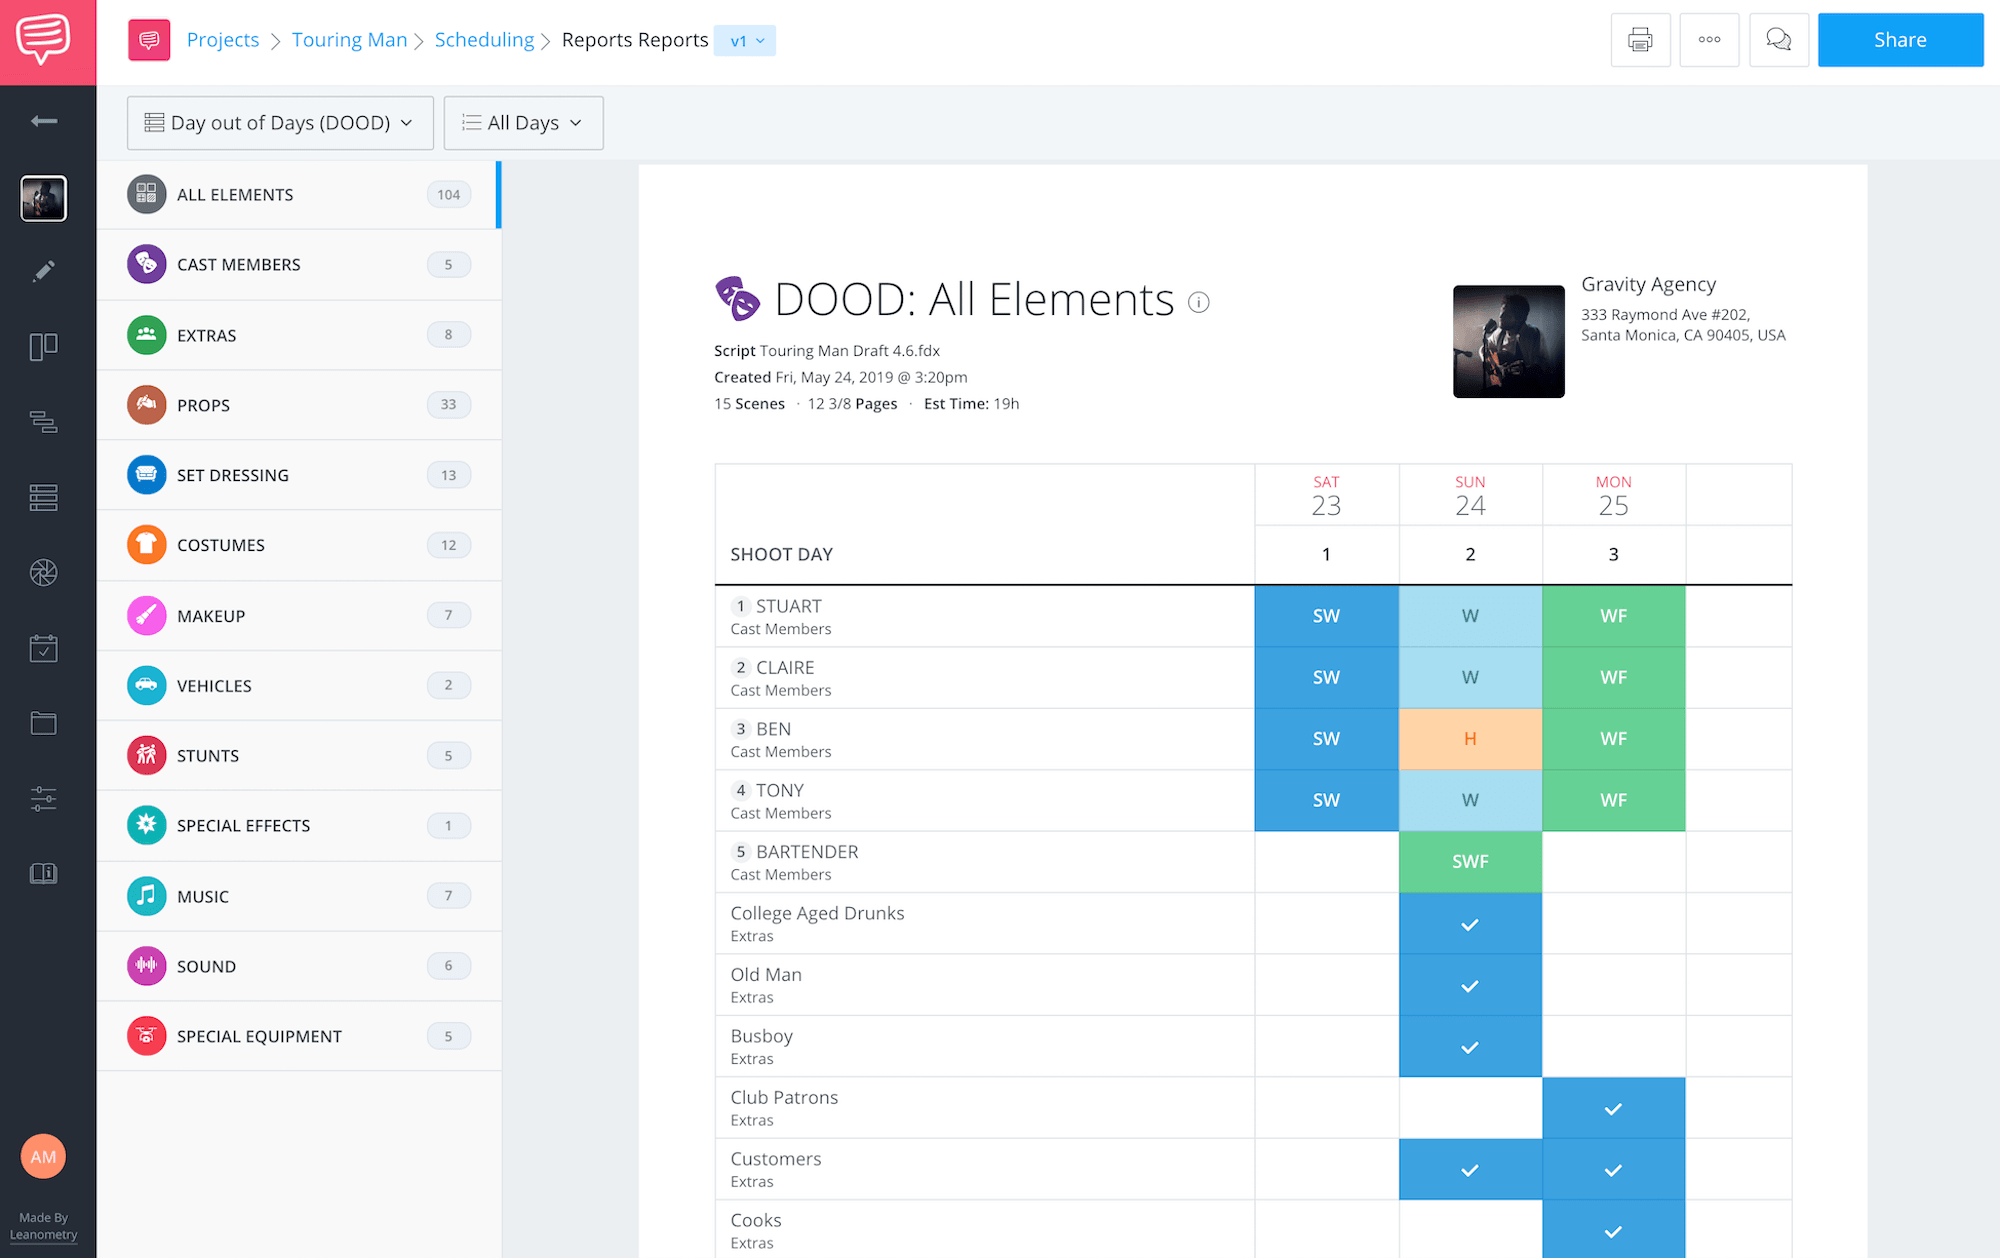
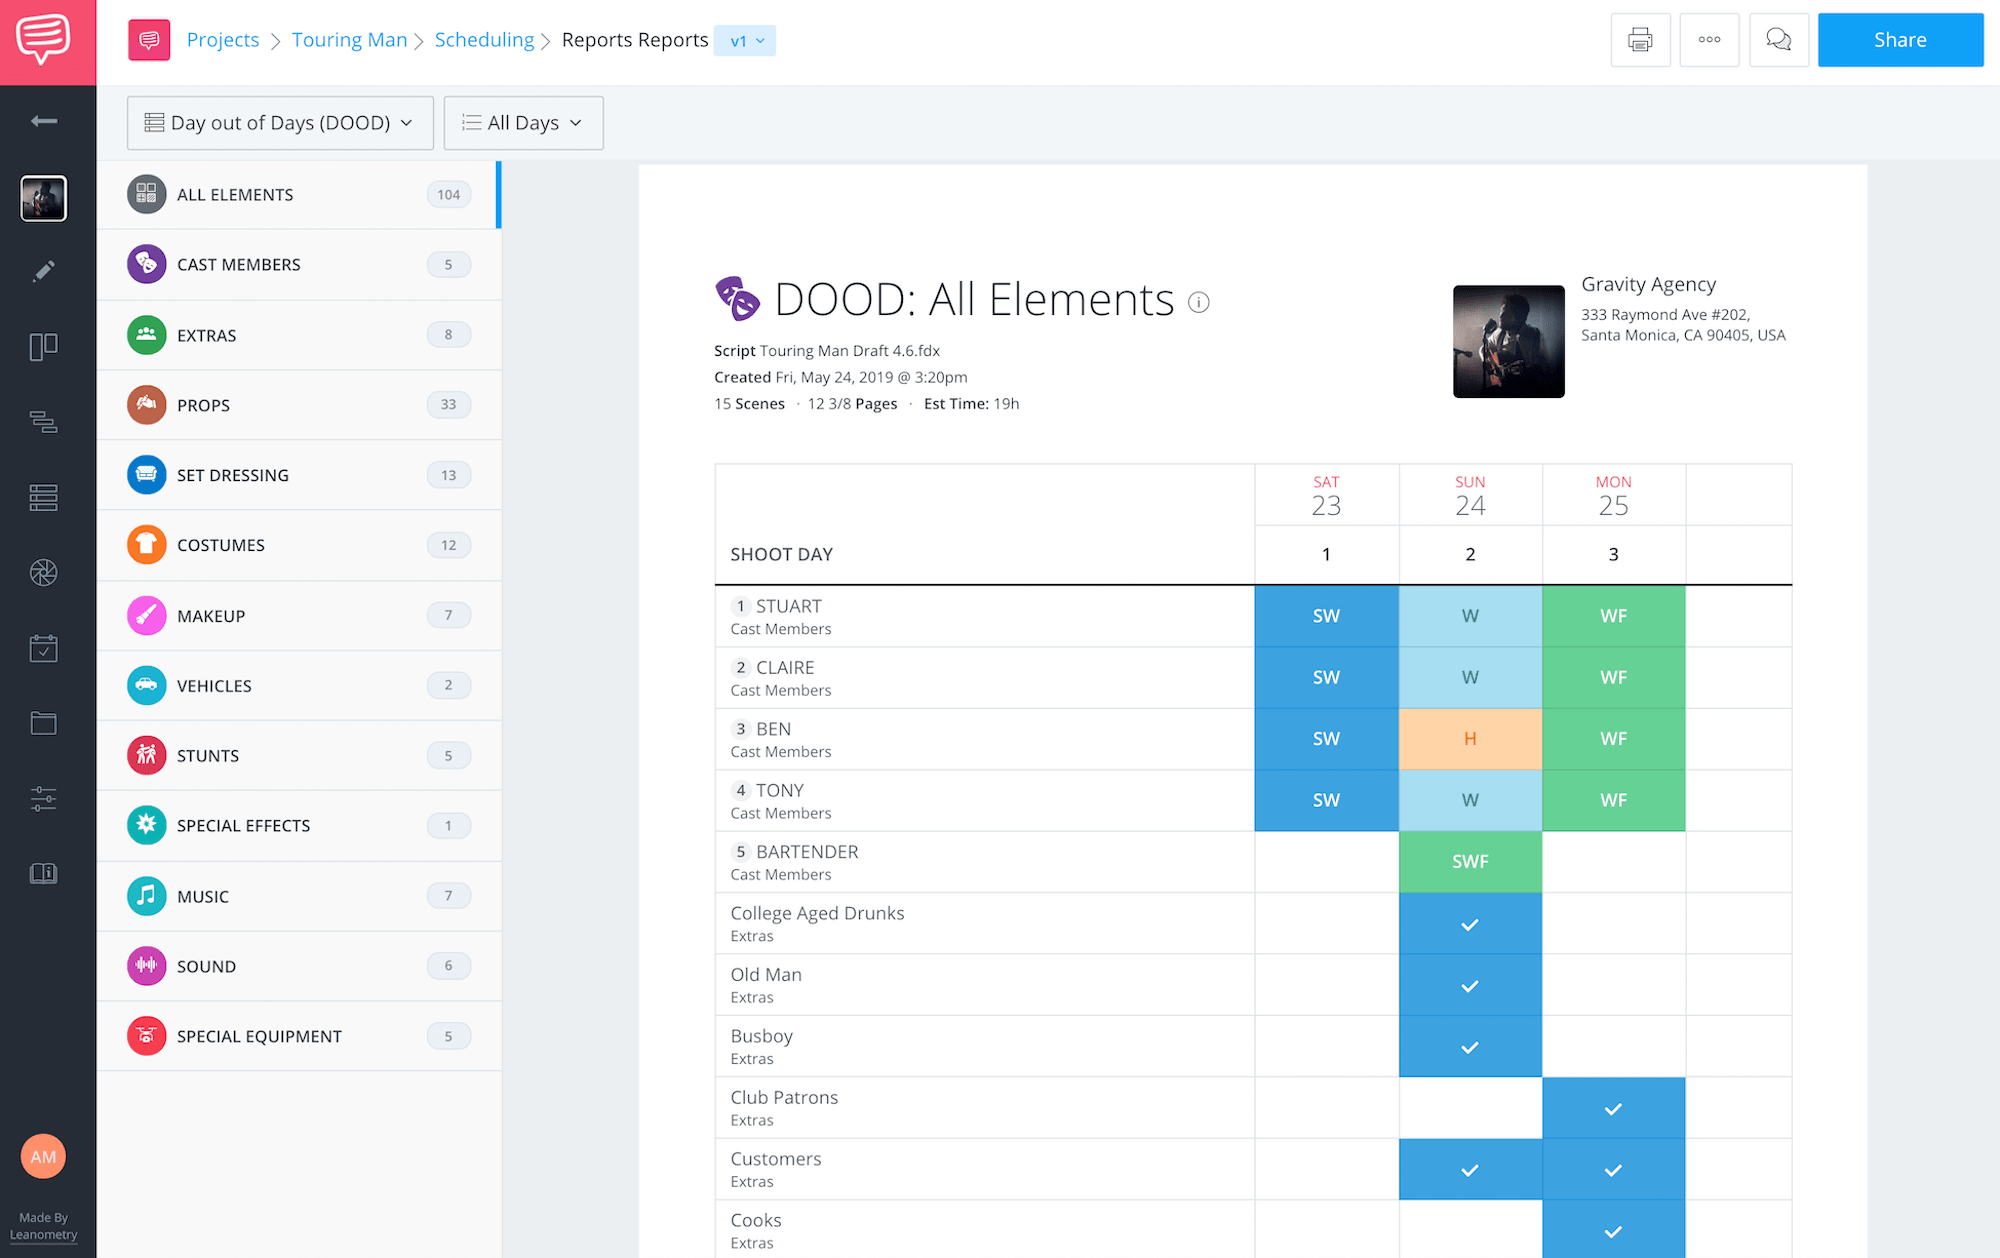
It looks something like this:
This is just to get you acclimated, we'll go into detail later about what every little thing means on the report.
The DOOD is a great organizational tool to stay on top of your budget. You can use it to determine where you can cut costs on cast.
Whether they are traveling, on hold, or actually working in front of the camera, the talent will cost you money. Taking a good look at the DOOD is a great way to get a quick view of any dangling days where you have your talent on hold when there is no reason to do so. Especially if money is super tight.
It's also helpful if the actor’s union is really strict. Maybe there are only a certain number of days he or she can work. And if you violate their agreement, your production will be in a ton of trouble. These are all important considerations when scanning the report.
You can learn more about the DOOD Report here, and how to use it on a macro level, but let’s dive into some practical steps.
Cast Considerations
2. Confirm your cast
Before we create the DOOD Report to determine how any days the actors are working, we should probably confirm which cast members are in which scenes.
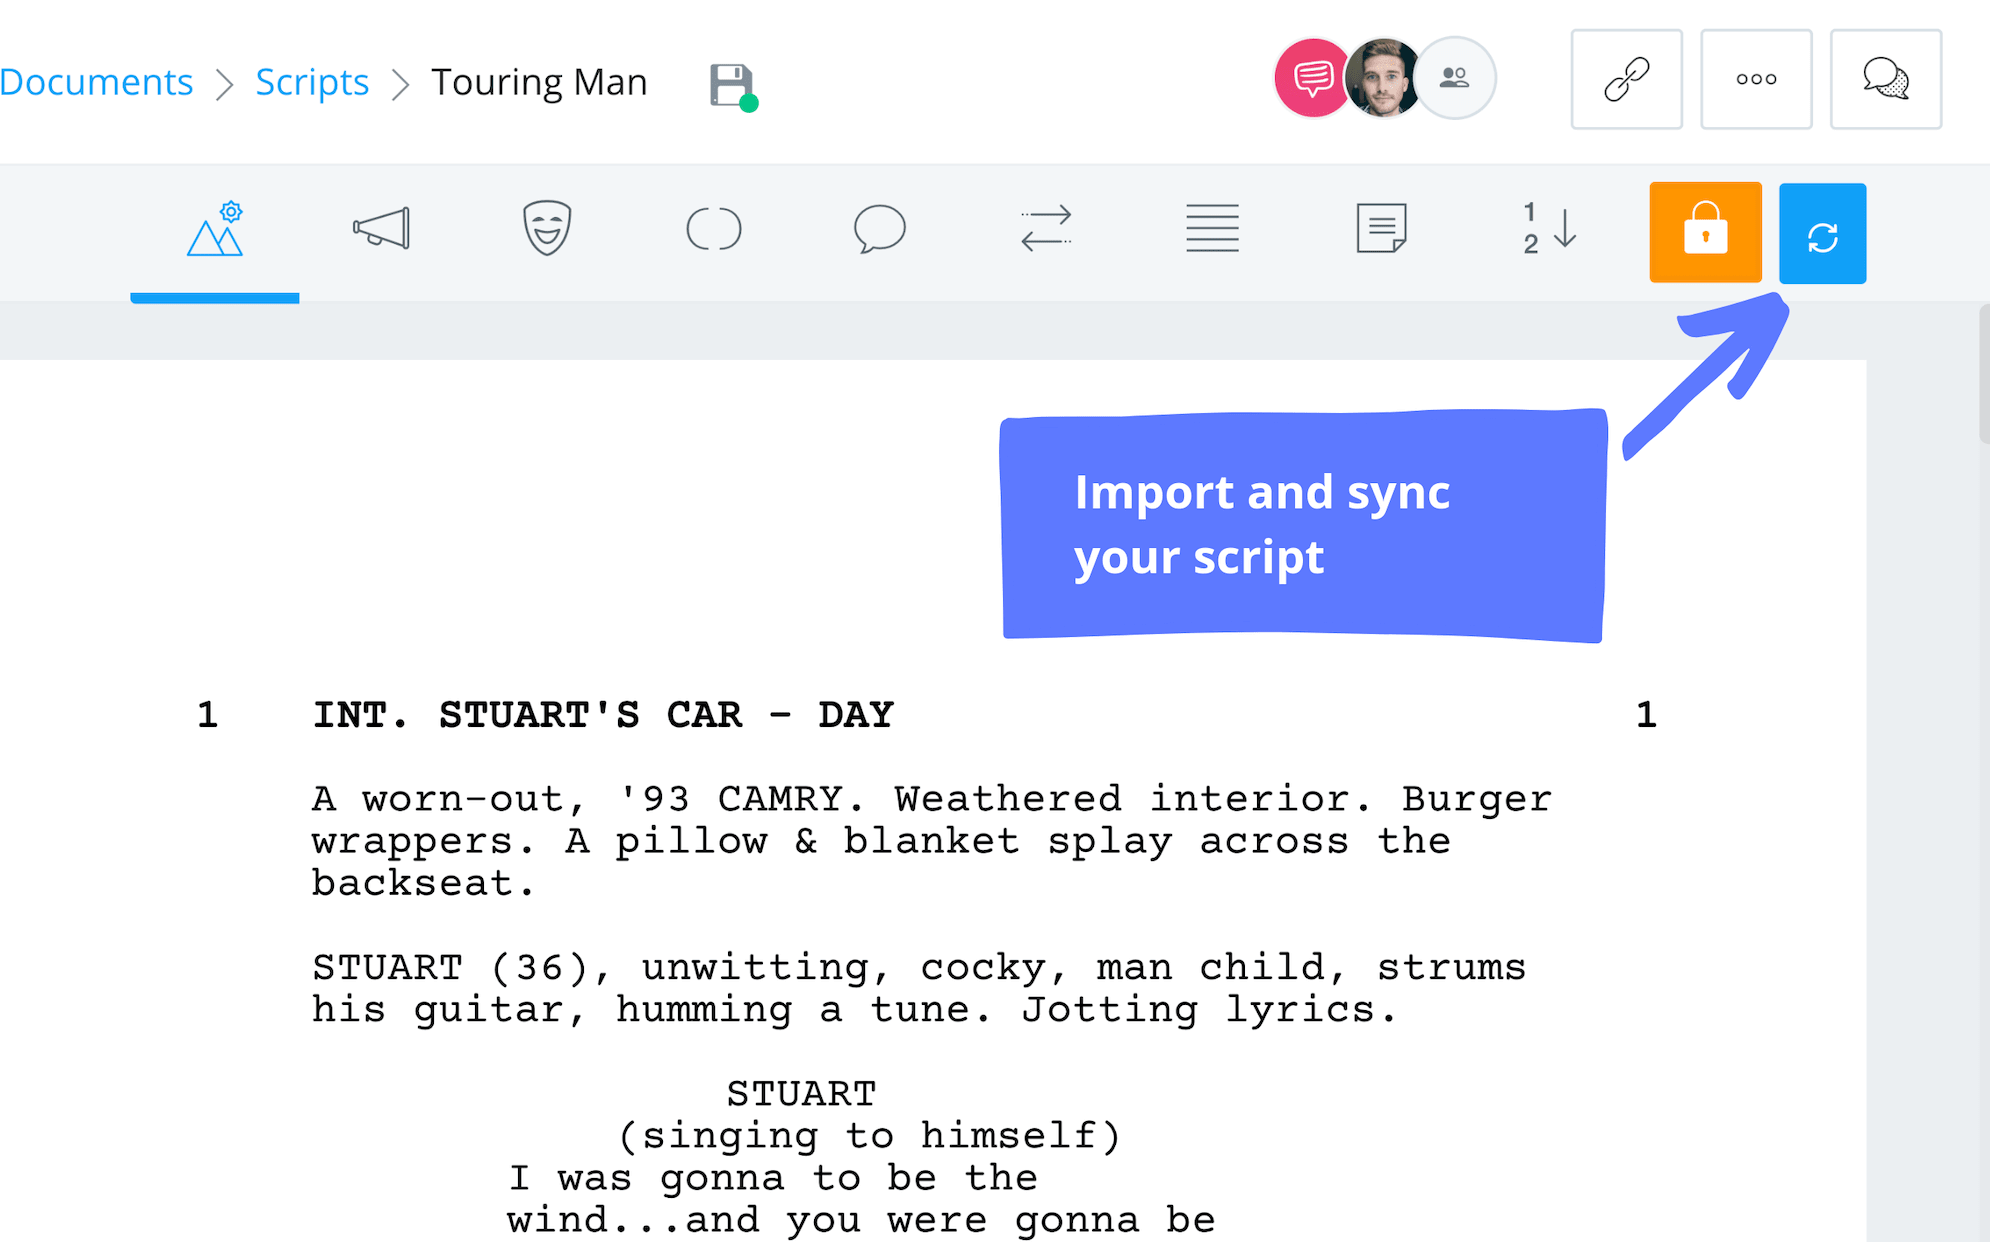
To do this, let’s simply import our script into StudioBinder. Once we import the script and hit this magical button labeled “sync,” in the top right corner, the script will do just that.
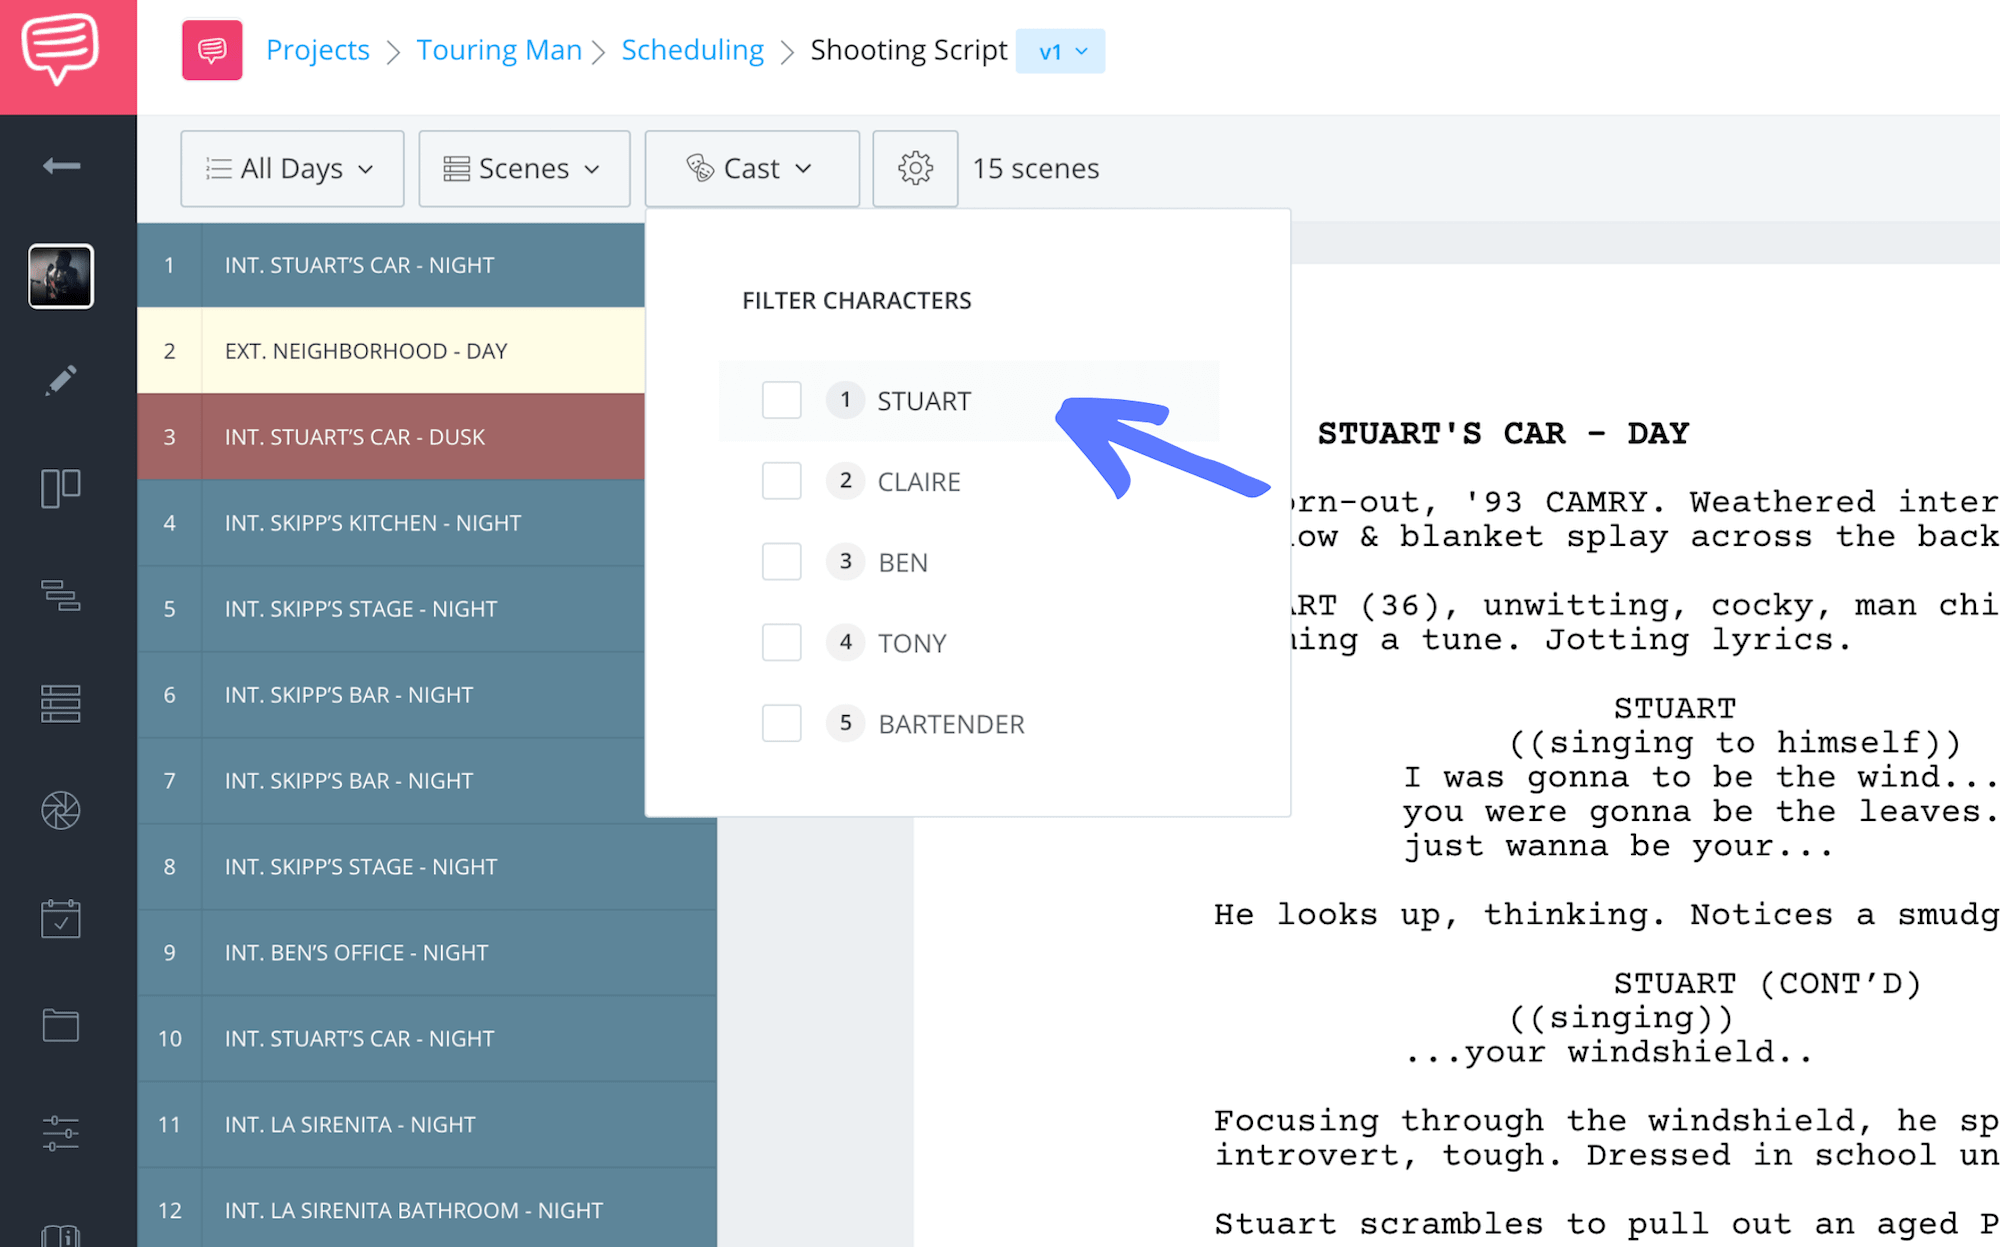
Your cast members will be pulled out and assigned an ID.
When we take a look at our shooting script, we see that our characters' names now have corresponding numbers.
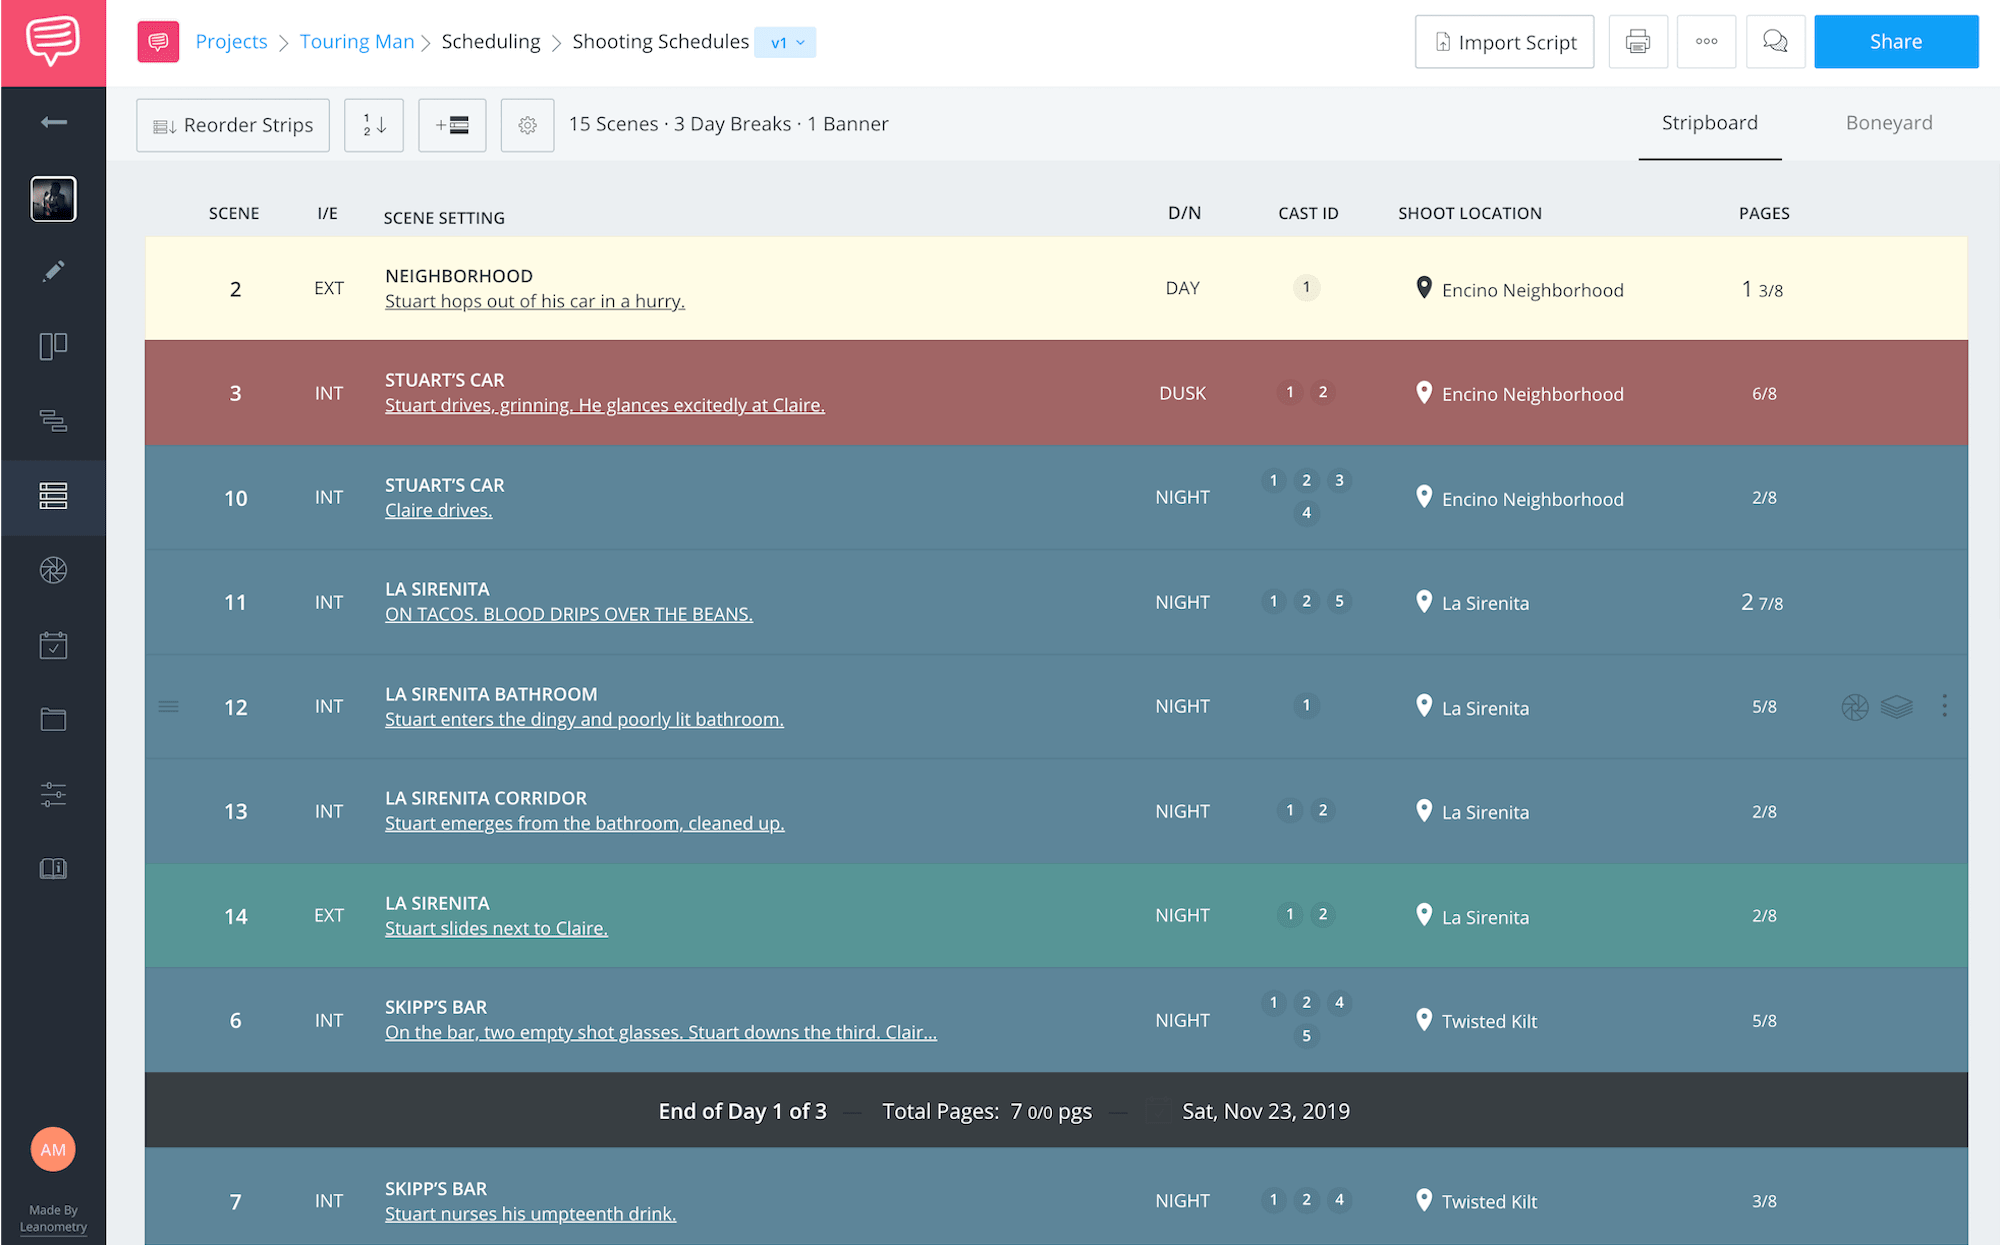
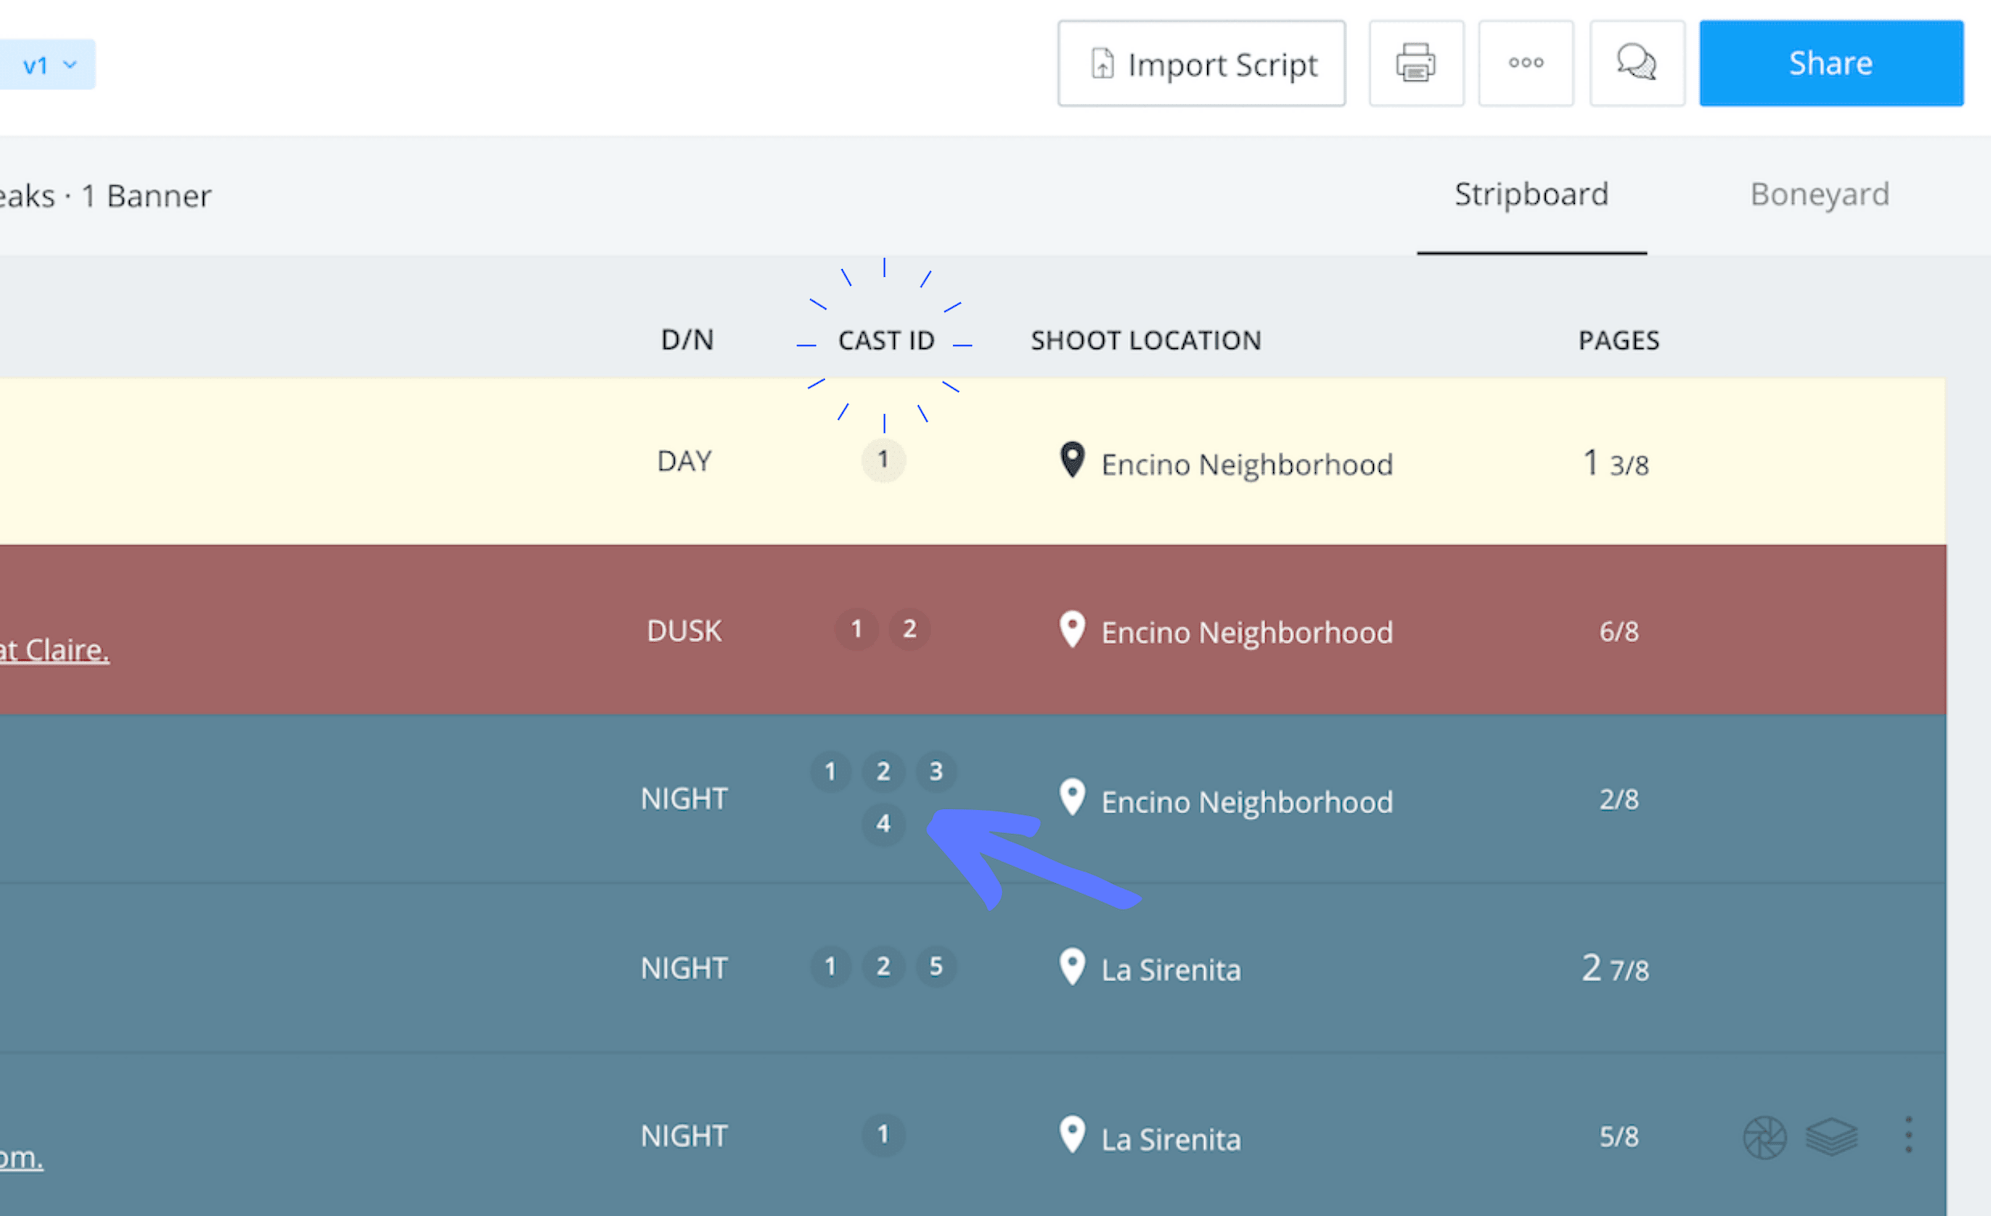
And now that our cast members all have corresponding numbers, these ID's will automatically populate onto strips on the stripboard. And when that happens, we can schedule our cast and their scenes accordingly.
You probably know what a stripboard is, but just in case you don’t, or if you need a refresher, a stripboard is quite literally a board of color-coded strips, and each strip has scene info on it. (And the color is based off of industry standard, and it depends on day/night, or int./ext.).
But it’s on the stripboard where you can arrange your strips to create your shooting schedule. See below:
The scene info on each strip can be a scene number, a scene heading, cast in that scene, and location. Notice the cast ID's populated. Take a closer look below:
As you view your stripboard, double check that all the cast members are assigned to each strip in the stripboard.
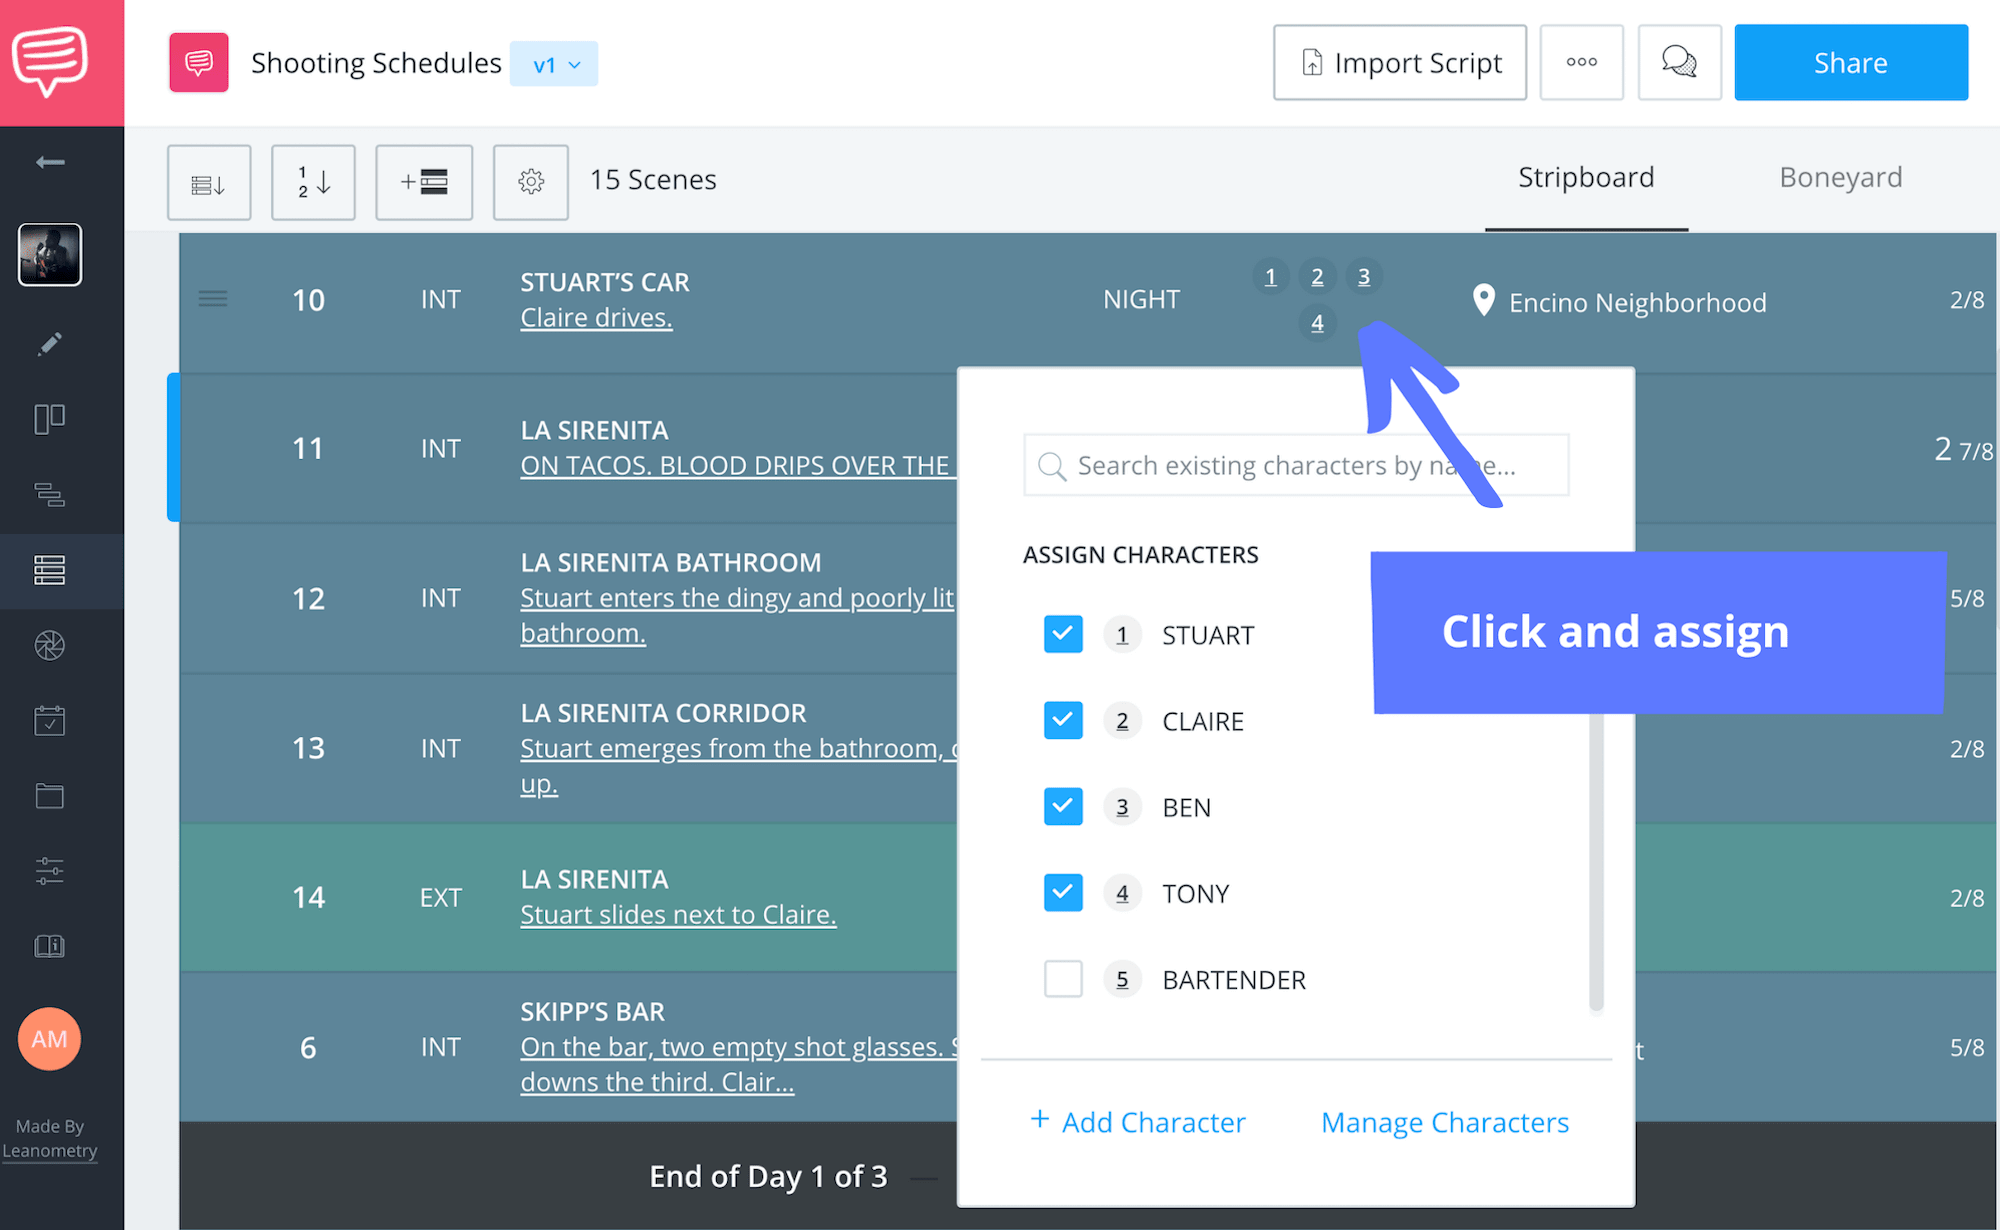
Important tip: cast is assigned based on dialogue, so make sure to confirm if there are any non-speaking cast present in a scene. If so, assign them right on the strip:
You can take any cast member off of the strip from this view as well.
Did You Know?
Understanding the Cast ID: Make sure to confirm cast ID ordering is correct.
Typically most important/prominent cast member should be 1, 2, 3, etc., (where 1 is most important). This is, by default, based on when cast is mentioned in script, but you can click-drag to reorder cast IDs at any point on the Cast Members page.
Now that you know a bit more about the strips and how cast is organized, let’s figure out how best to arrange the strips on the stripboard, to create the best schedule for your production.
Related Posts
Shooting Schedule Tips
3. Adding day breaks to the schedule
The info on the stripboard informs how you build your schedule. There are many things to consider when scheduling– typically talent is considered first. Make sure the schedule works with their busy life. And then of course, location is another huge consideration. Shooting all the scenes that happen in the same location typically makes the most sense on your budget.
Once you make those decisions, adding day breaks are a good next step for keeping your shoot days/weeks as organized as possible.
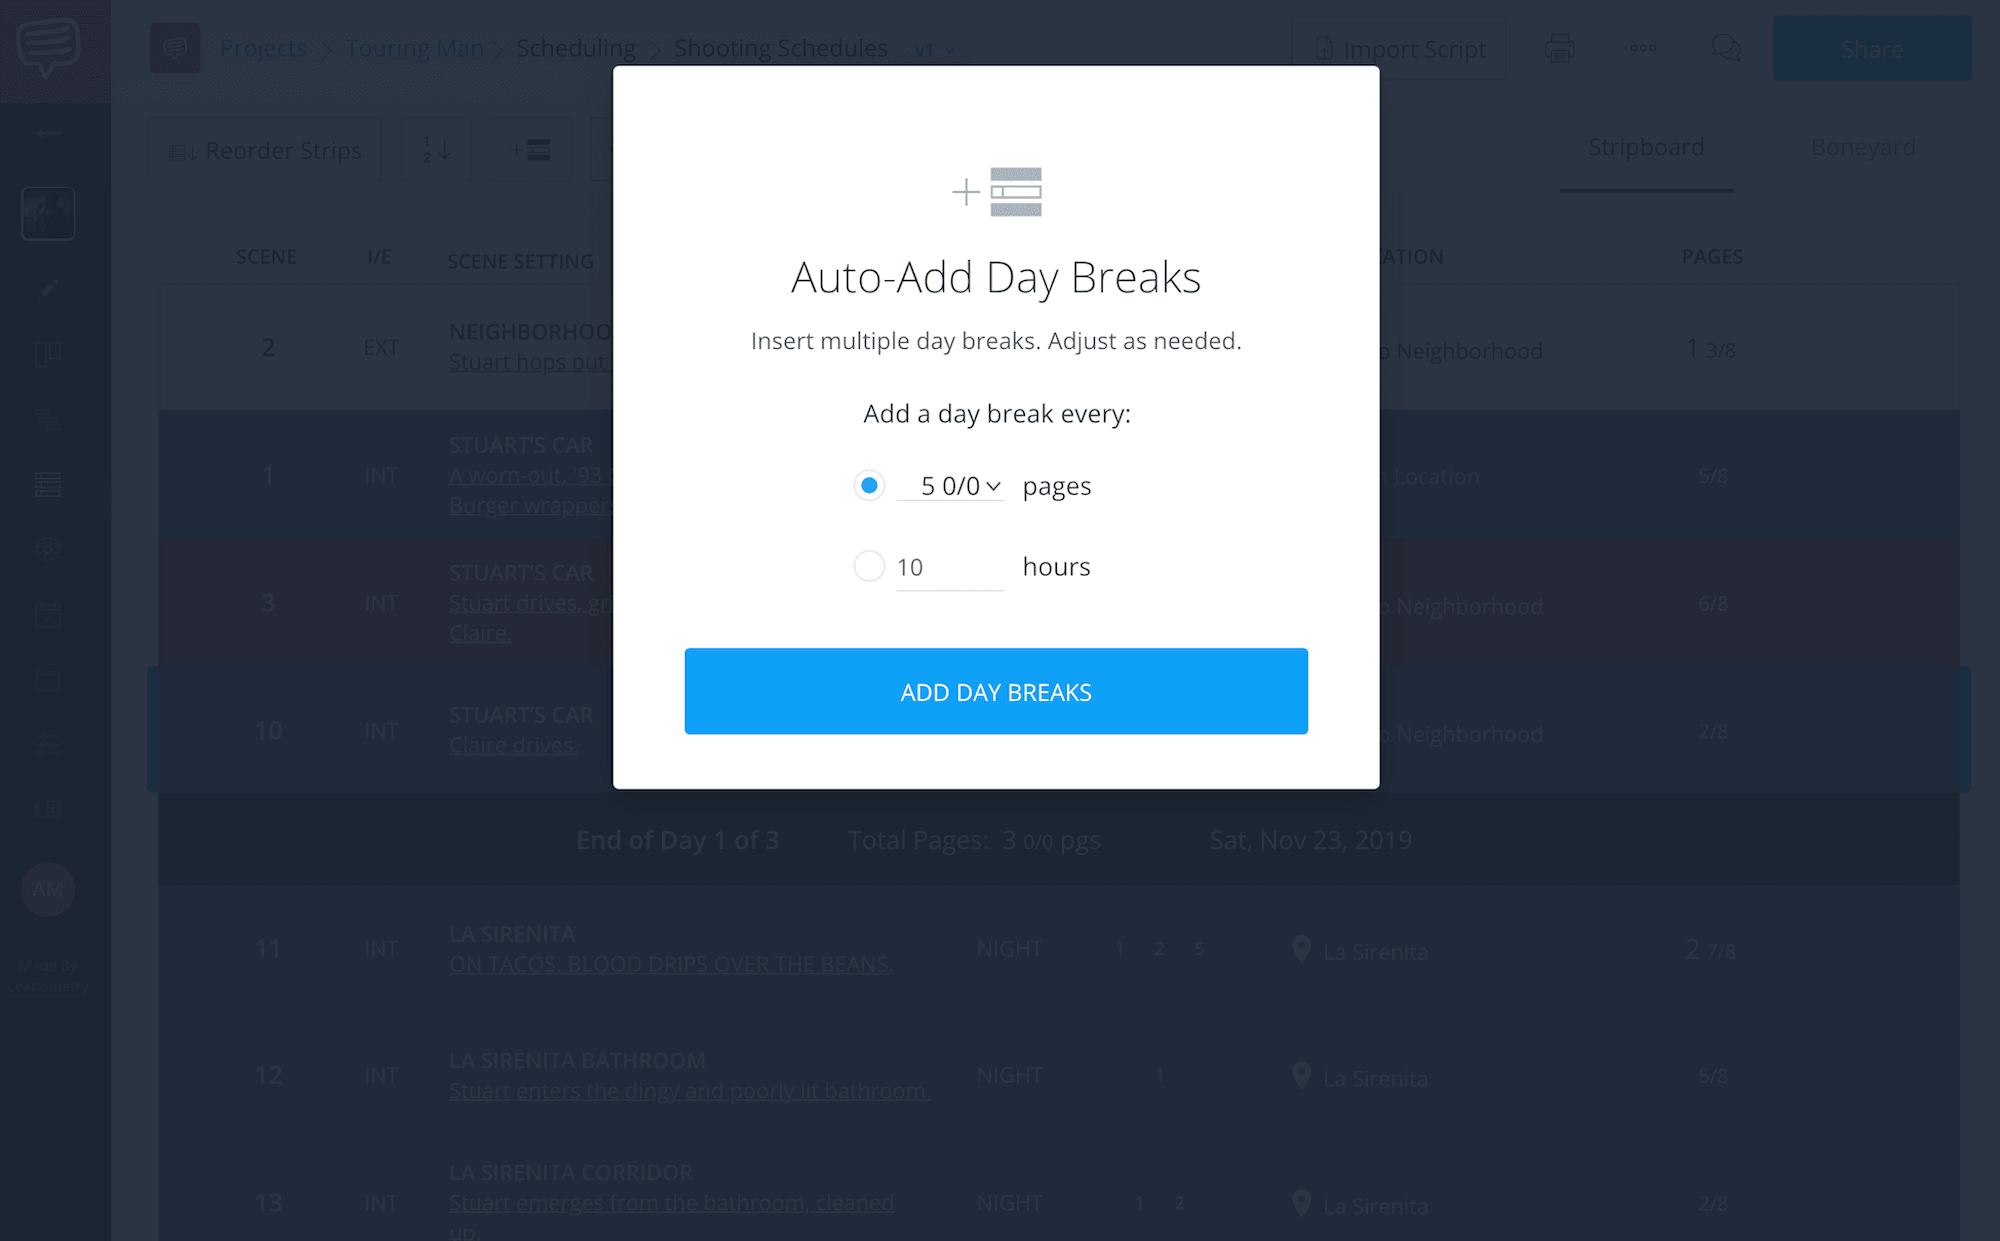
Add them by how many pages you plan to shoot in a day, add them by the amount of hours you plant to take, or, of course, add them in manually.
You can add these breaks easily in StudioBinder.
What about the DOOD, dude?
This info also gets populated when you run a DOOD Report.
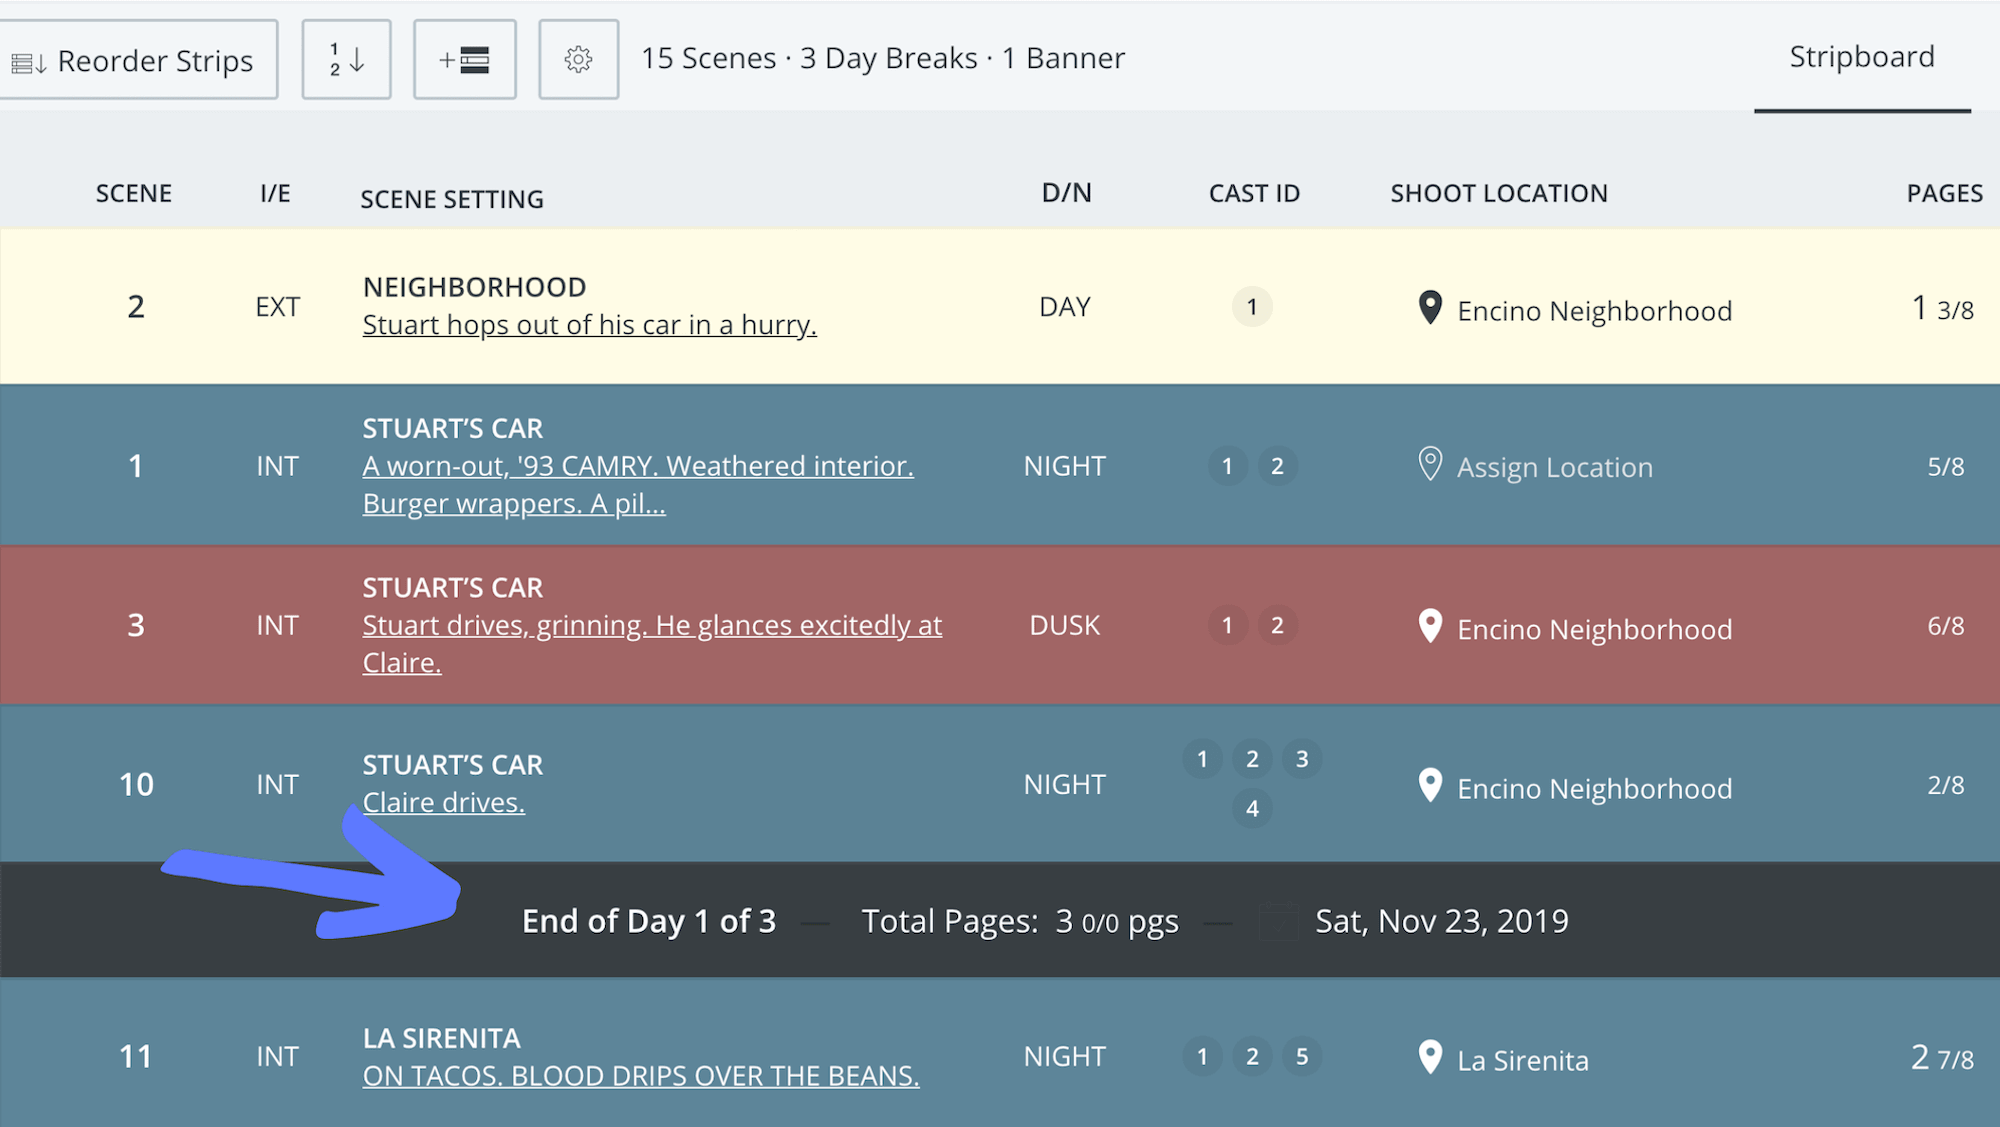
That's why day breaks are so important. If you forget to denote the end of Day 1, Day 2, etc., you could alter the DOOD Report’s accuracy.
Here’s a quick example...Cast ID number 4 might be scheduled on Day 1 only, but if you forget to use a day break denoting the end of that day, the report will say that cast member is supposed to be on two days in a row.
This inaccuracy could affect your budget or even waste the cast member’s time. Day breaks keep you and the entire schedule organized. Don’t forget to use them!
If you are only shooting one day, well, good for you, but also don’t forget to add banners. In the software you can add banners to note meal breaks, or any other piece of info you need to share.
Related Posts
Wrap Up
4. What’s up DOOD?
So now that you’ve figured out your schedule, it’s time to generate the DOOD Report. Once you hit “reports,” simply scroll down and click “Day out of Days.” It looks like this:
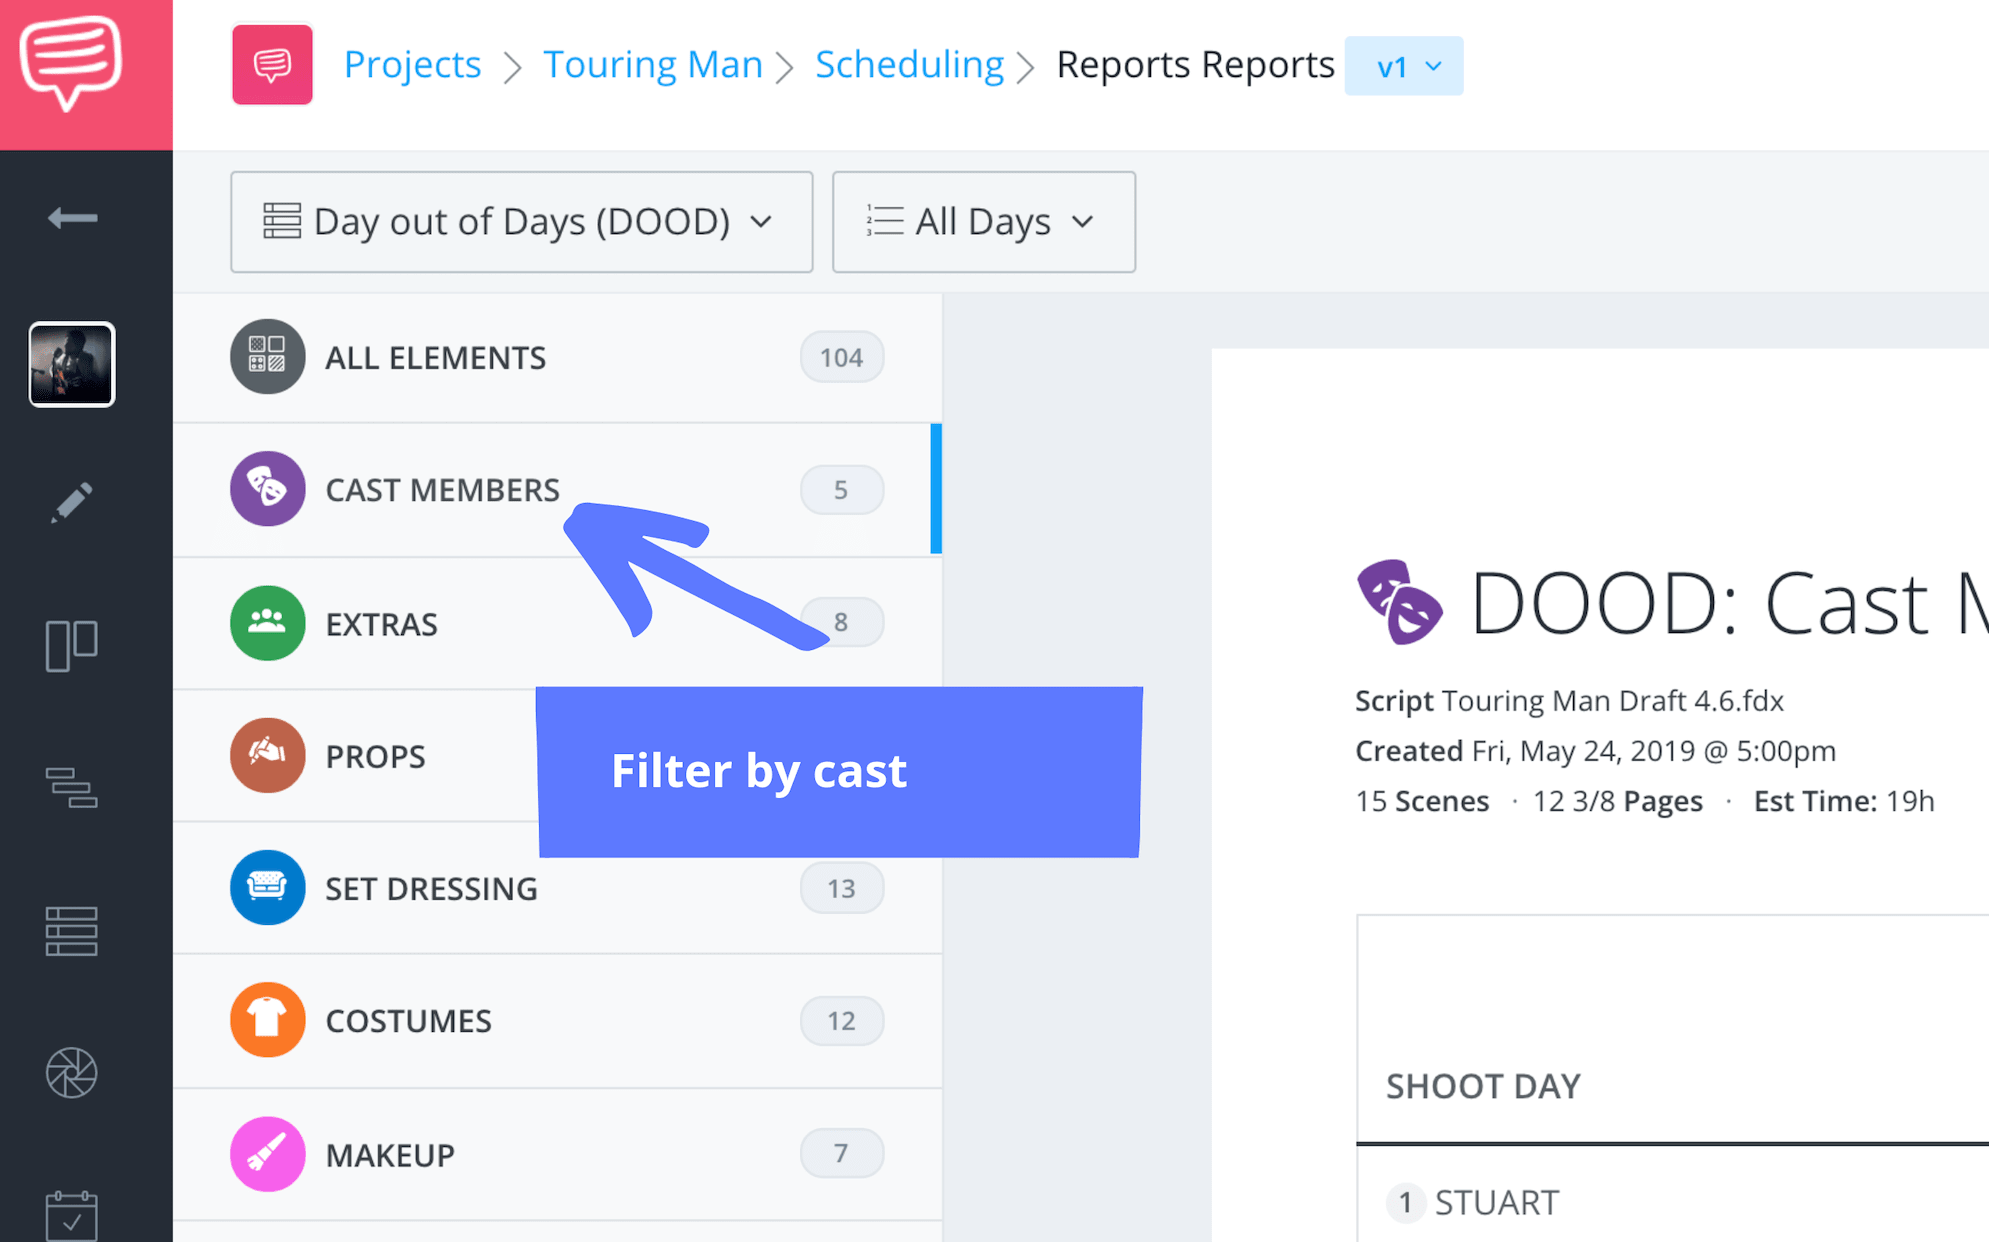
I personally would filter by cast because they (probably) will affect your budget the most.
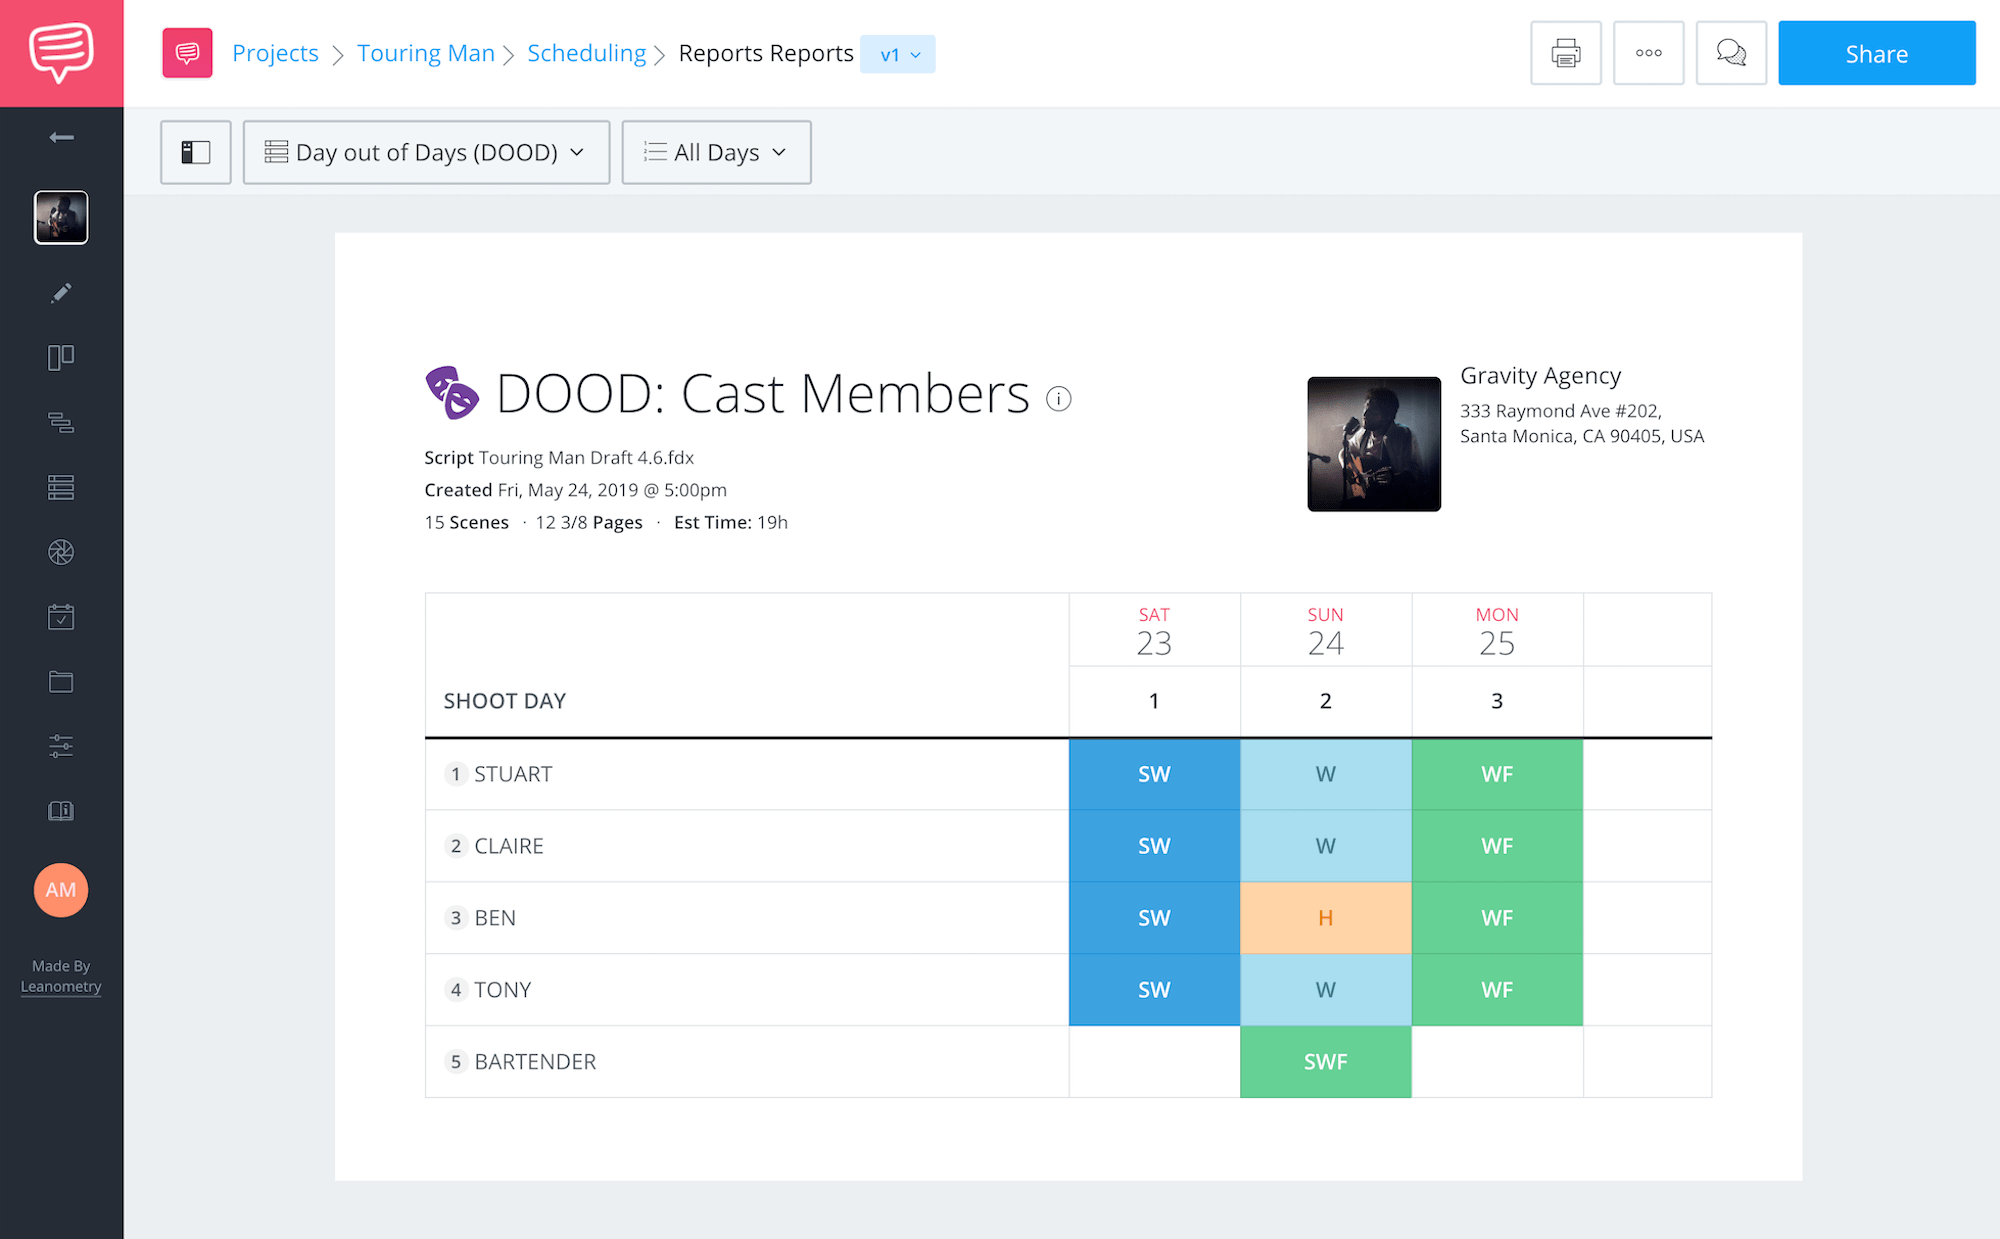
Once you filter by cast, you'll be able to see when each cast member starts work, is on hold, and what day they wrap. And it’s all thanks to our stripboard!
But what if you don’t know how to read it? This might look like jibberish to you if you don’t know those abbreviations. Never fear.
Here’s a helpful list of what they all mean:
- SW stands for “Start Work.” It denotes your actor’s first day working on set.
- W stands for “Work.” Use this abbreviation whenever your actor is working after start.
- WF stands for “Work Finish.” This is your actor’s last day on the job.
- SWF stands for “Start-Work-Finish.” It’s when an actor is only needed one day of the shoot.
- H stands for “Hold.” Use this when your actor isn’t needed, but is still on call and paid.
- I stands for “Idle.” This functions just like a Hold, but is not paid.
- T stands for “Travel.” It means your actor is traveling.
- R stands for “Rehearsal.” Use this when your actor is called to rehearse, but not shoot.
- WD stands for “Work-Drop.” Use this on your actor’s last day before a seven or more day hiatus.
- PW stands for “Pickup-Work.” Use this when an actor comes back from seven or more day hiatus.
- PWF stands for “Pickup-Work-Finish.” Use this when it’s your actor’s first and last on the job.
- SR stands “Start-Rehearsal.” Use this when your actor is rehearsing and its his or her first day.
Some film production software will only list the first five letters, but usually you can create custom labels to fit your production’s needs. If we look at the report now, we have a better understanding of what everything means.
Stuart, Claire, and Tony all start and end on the same day. They also work all three days. Ben however, is on hold for Day 2, but then the bartender who has a “SWF” only shoots for that one day.
How you use the DOOD is up to you. You don't have to filter by cast, you can filter by any element you want, and it will populate for the day it's scheduled.
For instance, if we filter by props, we would notice that a guitar is needed for all three days, but we only need the shot glasses for the last two. This is helpful to make sure we have everything prepped and ready.
This especially true when you’re dealing with specialty elements, like old fashioned cars, or race cars, anything where there might be some prep involved. Whatever it is, the DOOD Report will be your best friend.
Now it’s time to either print or share your report with the rest of your team!
Related Posts
Up Next
How to break down a script
Now that you’re familiar with the DOOD Report, hopefully you have a better grasp on how you can use it to cut costs on your own project.
Identifying and determining cast and their costs is critical to a successful production. Which is why it’s equally essential to know how to break down a scene to get this information. Learn how to breakdown your scenes to add another skill to your arsenal.

